How To: Add or Remove Azure Resource Groups
Note
Follow the same steps to create and configure Azure Government environments as you would Azure environments. When selecting a provider, such as during custom rule creation or when using the API, always select Azure.
After you have created an Azure environment, you can change the selected resource groups using the Fugue API.
The Fugue API allows you to update an environment in order to add or remove resource groups. To do so, you would use the PATCH method to send a request to the following path, substituting your own environment ID for {environment_id}:
https://api.riskmanager.fugue.co/v0/environments/{environment_id}
The request body is where you indicate which resource groups you want Fugue to scan. For example, if your environment only scans the dev-eastus resource group but you want to add prod-centralus and NetworkWatcherRG, your request body might look like this:
{
    "provider": "azure",
    "provider_options": {
        "azure": {
            "survey_resource_groups": [
                "dev-eastus",
                "prod-centralus",
                "NetworkWatcherRG"
            ]
        }
    }
}
The resources you list in the survey_resource_groups array replace whatever resources were previously selected. So in this case, to continue scanning dev-eastus, you would include it in the array.
If you’d like Fugue to scan all the resource groups in your subscription, you can enter * in the survey_resource_groups array instead of specific resource groups:
{
    "provider": "azure",
    "provider_options": {
        "azure": {
            "survey_resource_groups": [
                "*"
            ]
        }
    }
}
Note that when you do so, Fugue will automatically detect new resource groups and add them to your environment. You can send another API request to change back to a subset of resource groups at any time, at which point Fugue no longer automatically adds new resource groups to the environment (unless you select all resource groups with * again).
Updating Selected Resource Groups with curl
To use curl to update an environment using the example above, you would use the following command:
curl -X PATCH \
https://api.riskmanager.fugue.co/v0/environments/75e7e69a-0af4-4561-9763-000000000000 \
-u $CLIENT_ID:$CLIENT_SECRET \
-d '{
    "provider": "azure",
    "provider_options": {
        "azure": {
            "survey_resource_groups": [
                "dev-eastus",
                "prod-centralus",
                "NetworkWatcherRG"
            ]
        }
    }
}'
When the command succeeds, the API returns a JSON document including the details of the updated environment.
To learn more about updating an environment with the API, see Updating an Environment. For more information about using curl, see API Tools. To see the full Swagger documentation, see the API Reference. Or, for general instructions, see the API User Guide.
Updating Selected Resource Groups with Postman
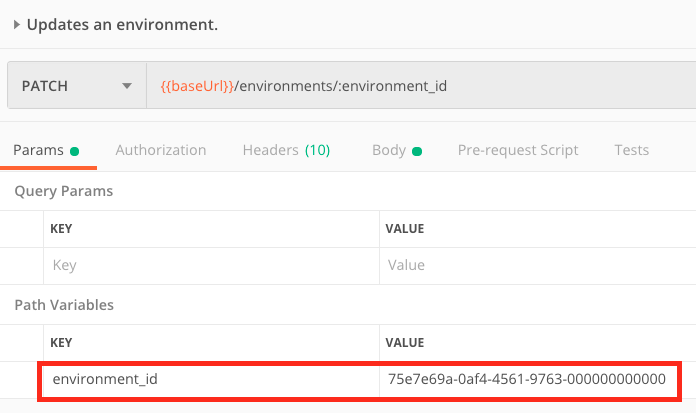
To use Postman to update an environment using the example above, select the PATCH - Updates an environment request from the Fugue API Postman collection, then enter the environment_id path variable on the “Params” tab:
Next, select the “Body” tab and paste your request body into the text box:
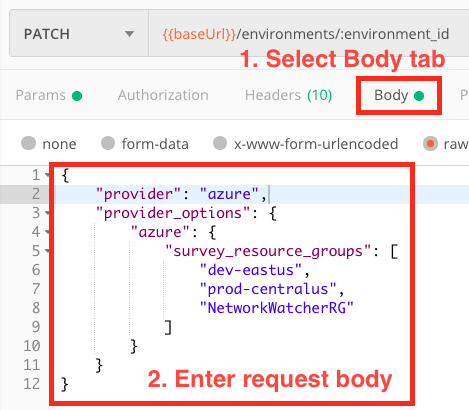
Here’s the request body we used for the example curl command:
{
    "provider": "azure",
    "provider_options": {
        "azure": {
            "survey_resource_groups": [
                "dev-eastus",
                "prod-centralus",
                "NetworkWatcherRG"
            ]
        }
    }
}
When you’re ready, hit the “Send” button, and when the request succeeds you’ll see a 200 OK status and a JSON document including the details of the updated environment.
To learn more about updating an environment with the API, see Updating an Environment. For more information about using Postman, see API Tools. To see the full Swagger documentation, see the API Reference. Or, for general instructions, see the API User Guide.