Reports & Dashboards
Note
Other ways to access compliance information:
Compliance Report Email – receive a daily or weekly compliance overview of one environment
Notifications – get notified of compliance changes in an environment
Export Data – download a CSV or Excel file of compliance data for an entire organization
Fugue’s Reports page contains several predefined reports and dashboards that show different aspects of an organization or tenant compliance state.
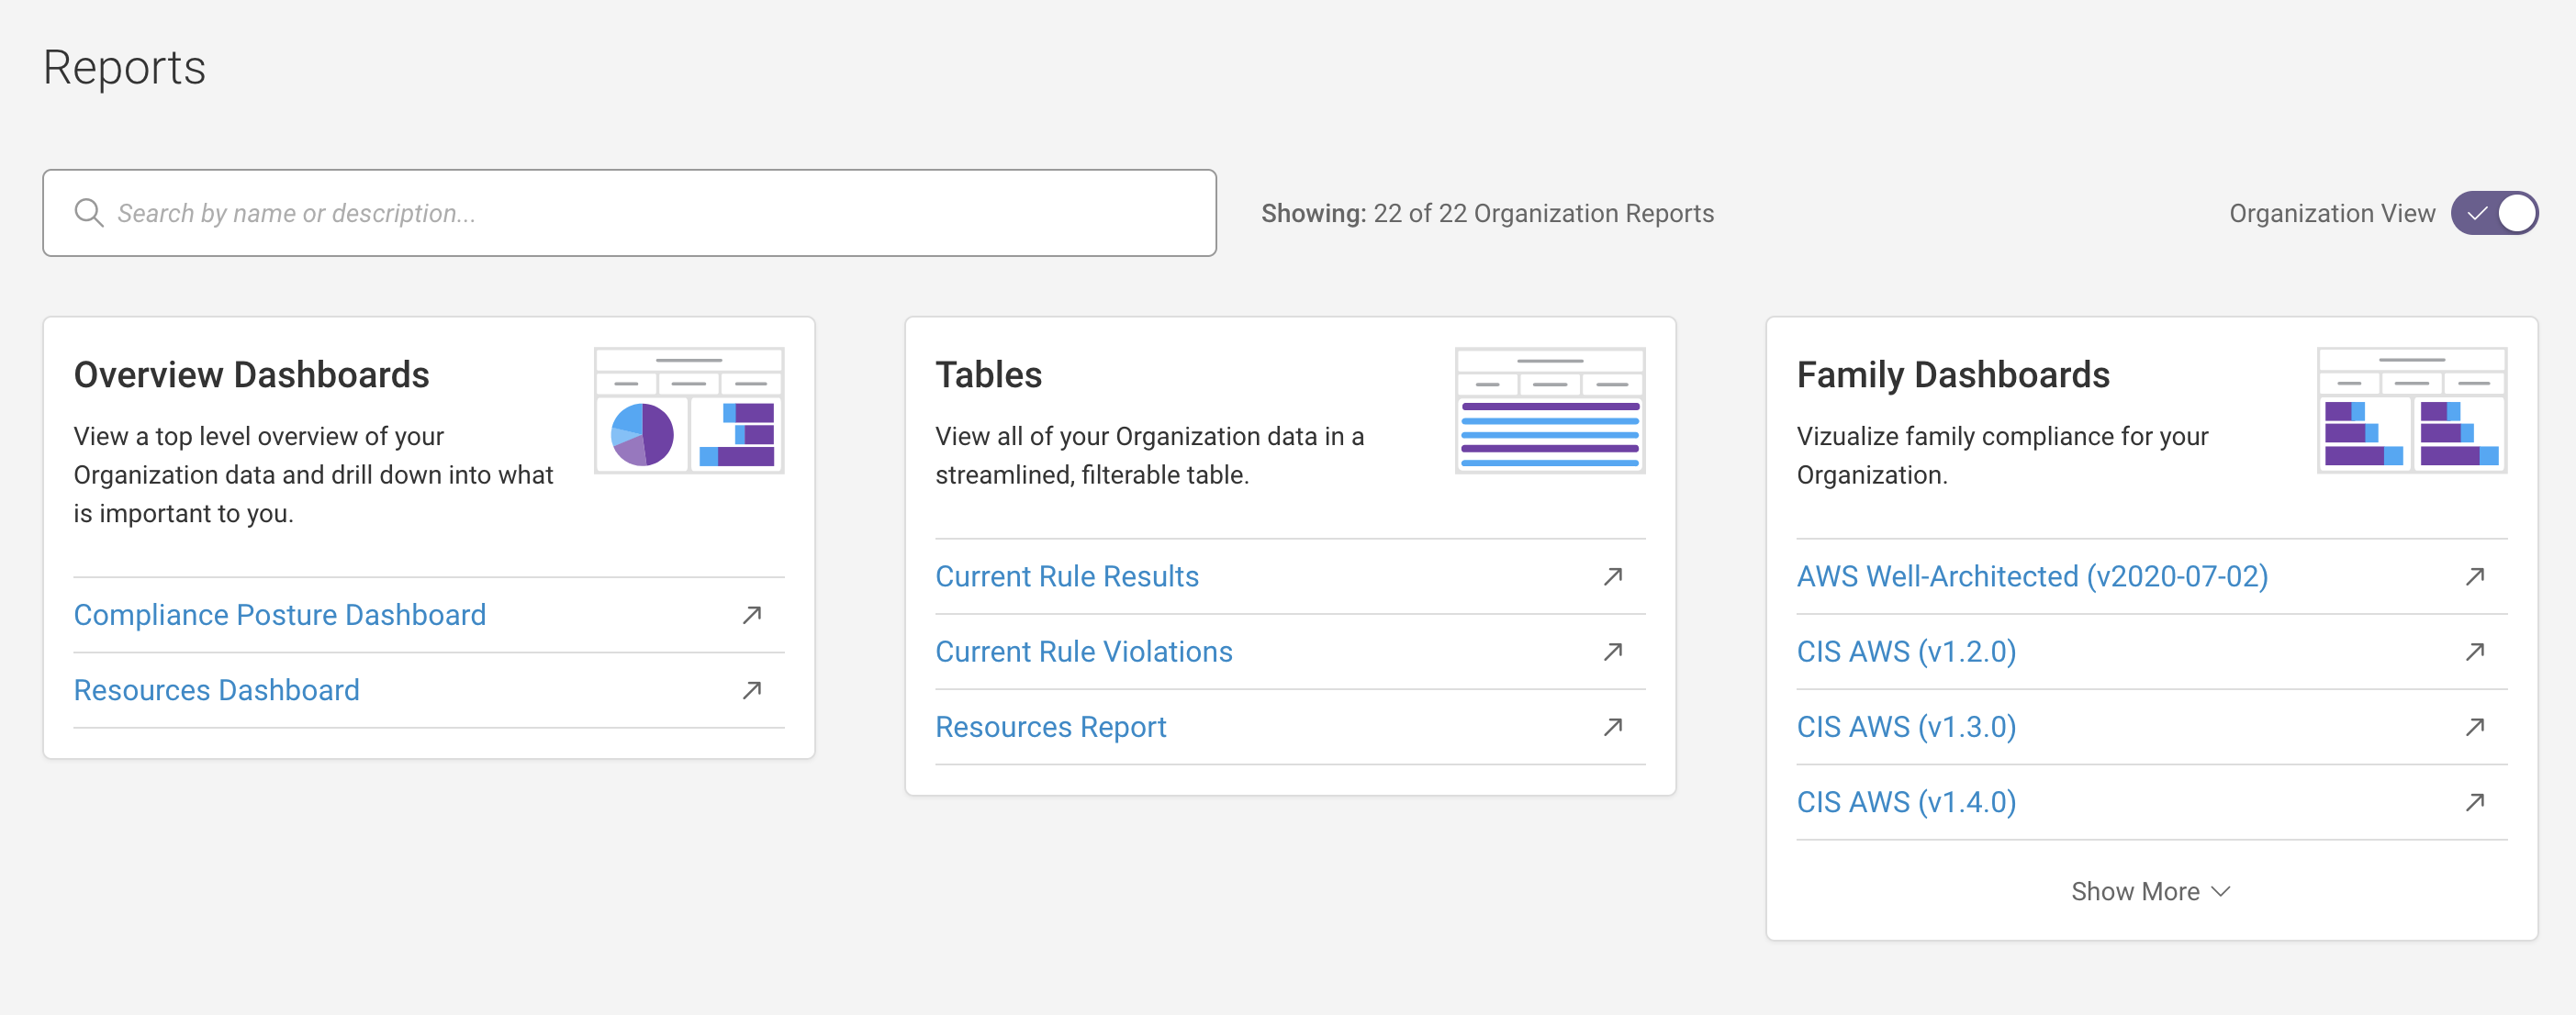
There are three categories of reports and dashboards:
Overview Dashboards
Tables
Compliance Family Dashboards for supported compliance families:
AWS Well-Architected Framework
CIS AWS Foundations Benchmark
CIS Azure Foundations Benchmark
CIS Controls
CIS Docker Benchmark
CIS Google Foundations Benchmark
CIS Kubernetes Foundations Benchmark
CSA Cloud Controls Matrix
GDPR
HIPAA
ISO 27001
NIST 800-53
PCI DSS
SOC 2
Organization View vs. Tenant View
Organization View and Tenant View both feature the same reports and dashboards, but the data reflects different sources:
Organization View incorporates data across all tenants in your organization.
Tenant View incorporates data across all environments in a single tenant.
If you have Fugue Organizations enabled and you are logged into the root tenant, Organization View is selected by default. You can toggle Organization View off to display Tenant View instead:
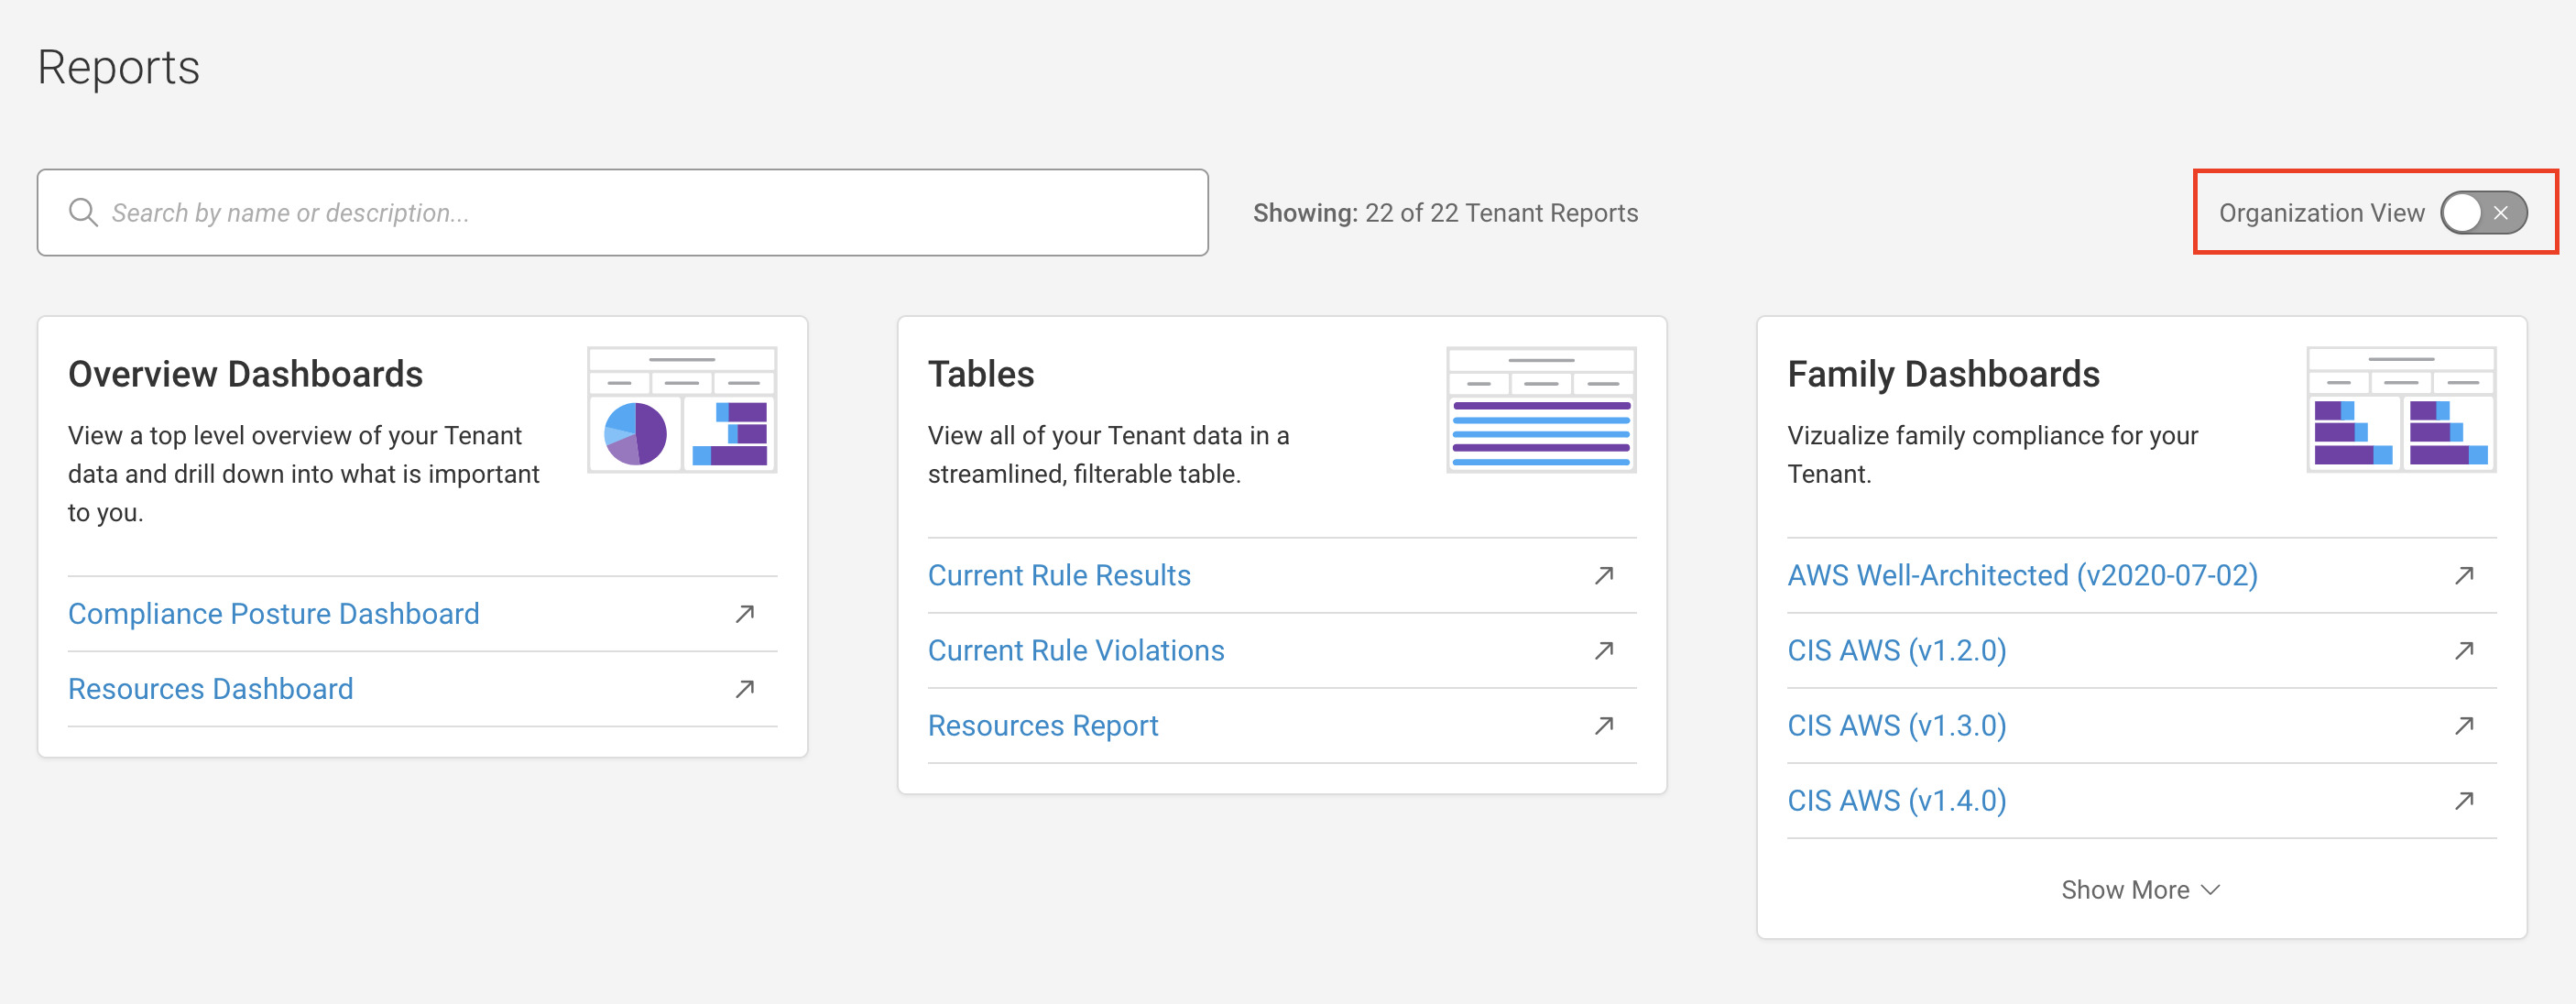
If you’re in a child tenant, or if you don’t have Fugue Organizations enabled, you can only access the Tenant View. The Organization View toggle is not shown.
Report Actions
Selecting a dashboard or report displays it within the UI with default values set for the filters. You can take the following actions:
Change the exposed filters of the report/dashboard
Download the report/dashboard as a PDF or set of XLSX/CSV files
Send an email with the report/dashboard to one or more recipients
Schedule an email with the report/dashboard for one or more recipients
Schedule a report to be sent to an AWS S3 bucket using an IAM Role
Schedule a report to be sent to an AWS S3 bucket using Access Keys
Configure email alerts when a metric breaches a specified threshold
Drill into a report for further investigation
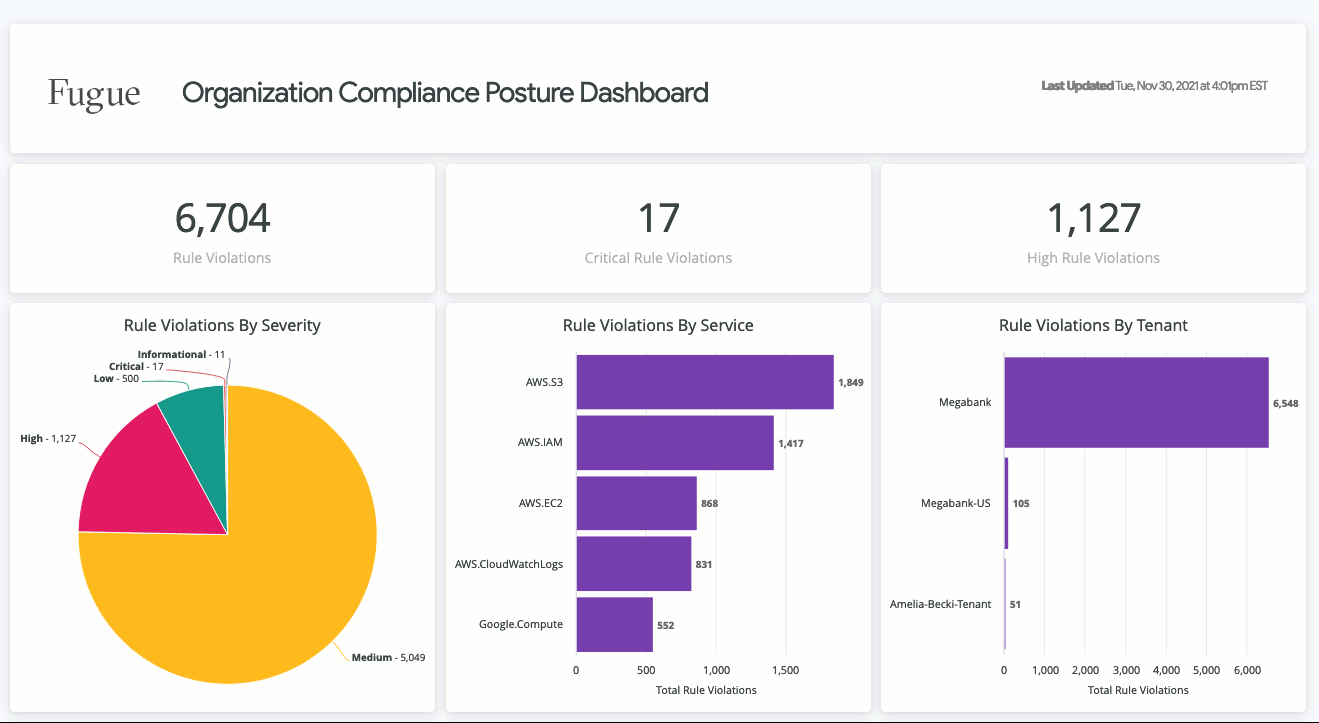
Compliance Posture Dashboard
The Compliance Posture Dashboard for an organization or tenant allows you to visualize information on rule violations by severity, service, tenant (Organization View only), environment, as well as resource compliance and control evaluations over time.
Example Tenant View:

Rule Violations (Total)
Critical Rule Violations (Total)
High Rule Violations (Total)
Rule Violations By Severity (Total)
Rule Violations By Service (Total)
Rule Violations by Tenant (Total) – Organization View only
Rule Violations By Environment (Total) – Tenant View only
Rule Violations Over Time (Total) (does not support drills)
Resource Noncompliant Over Time (Percentage) (does not support drills)
Control Evaluations By Family (Percentage)
Compliance Posture Dashboard Filters
Tenant (Organization View only)
Service provider (e.g., AWS, AWS_GOVCLOUD, AZURE, GOOGLE, or REPOSITORY)
Environment
Data from (time frame)
Resources Dashboard
The Resources Dashboard for an organization or a tenant allows you to visualize information on resource compliance by resource type, severity, tenant (Organization View only), and environment over time for an organization or tenant.
Example Tenant View:
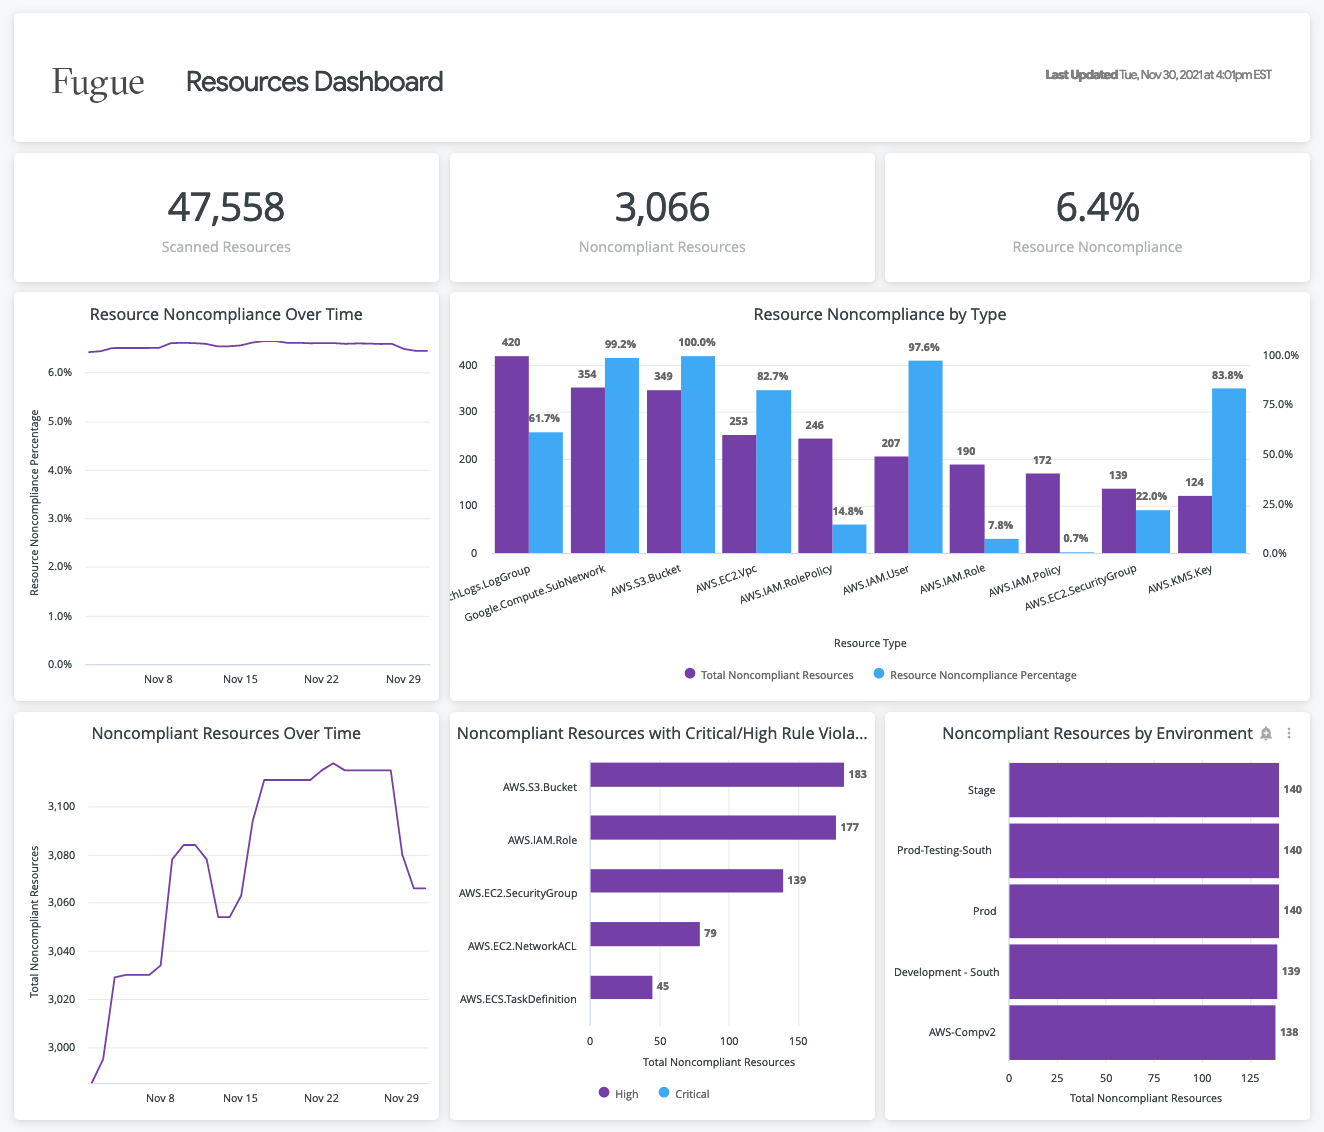
Scanned Resources (Total)
Noncompliant Resources (Total)
Resource Noncompliance (Percentage)
Resource Noncompliance Over Time (Percentage) (does not support drills)
Resource Noncompliance by Type (Total and Percentage) (does not support drills)
Noncompliant Resources Over Time (Total)
Noncompliant Resources with Critical/High Rule Violations (Total)
Noncompliant Resources by Tenant (Total) – Organization View only
Noncompliant Resources by Environment (Total) – Tenant View only
Resources Dashboard Filters
Tenant (Organization View only)
Service provider (e.g., AWS, AWS_GOVCLOUD, AZURE, GOOGLE, or REPOSITORY)
Environment
Data from (time frame)
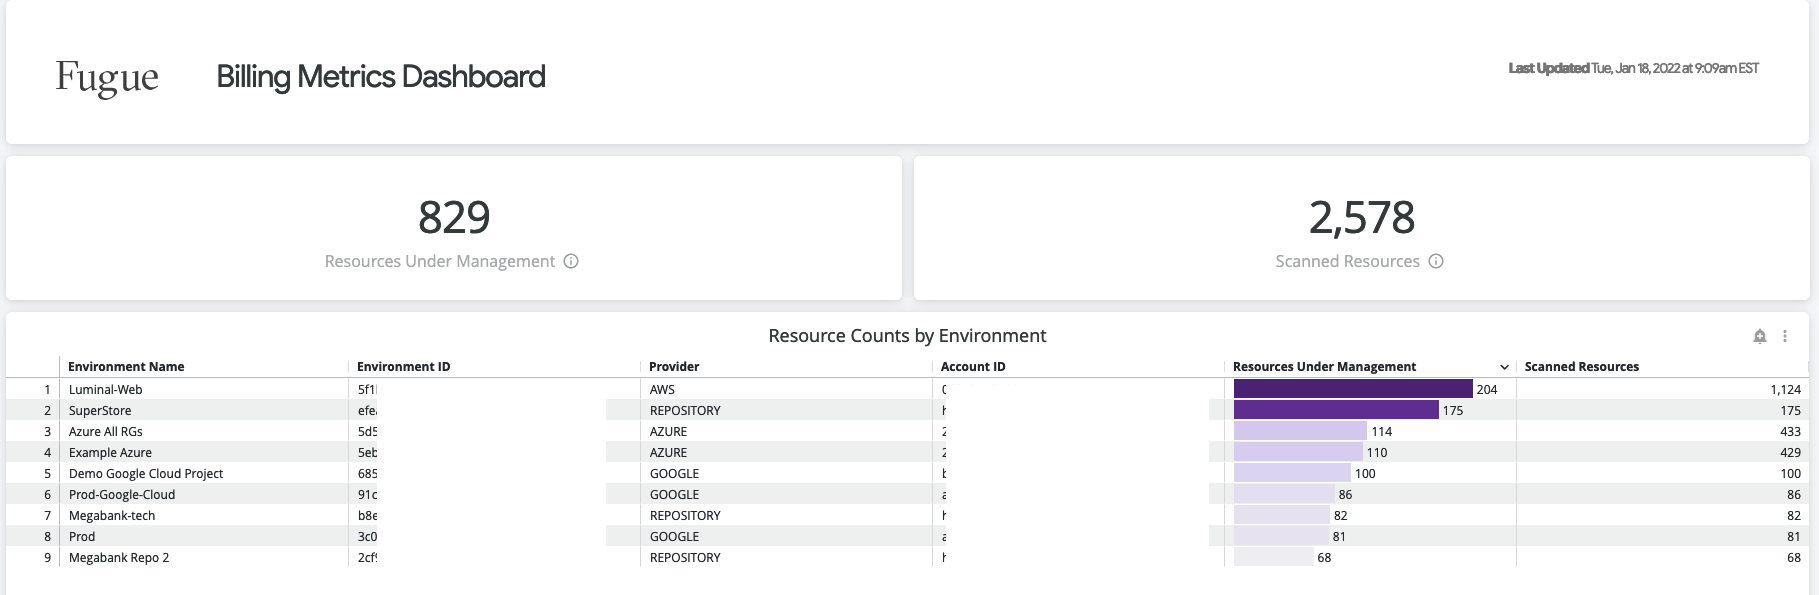
Billing Metrics Dashboard
The Billing Metrics Dashboard for a tenant or an organization provides an aggregate of Resources Under Management (RUM) and Scanned Resources for a tenant or organization.
Example Tenant View:
Billing Metrics Dashboard Filters
Tenant (Organization View only)
Service provider (e.g., AWS, AWS_GOVCLOUD, AZURE, GOOGLE, or REPOSITORY)
Environment
Current Rule Results
The Current Rule Results table for an organization or a tenant allows you to view details in tabular format on rule results data, including information on resource tags.
Example Tenant View:

Current Rule Results Filters
Tenant (Organization View only)
Environment
Service provider (e.g., AWS, AWS_GOVCLOUD, AZURE, GOOGLE, or REPOSITORY)
Account ID
Rule Name
Rule ID
Rule Result
Severity
Resource Type
Tag
Control
Compliance Family (including custom families)
Current Rule Violations
The Current Rule Violations table for an organization or tenant allows you to view details in tabular format on outstanding rule violations and filter by severity, resource type, rule, and more. (Does not support drills.)
Example Tenant View:

Current Rule Violation Filters
Tenant (Organization View only)
Service provider (e.g., AWS, AWS_GOVCLOUD, AZURE, GOOGLE, or REPOSITORY)
Environment
Rule severity level
Resource type
Provider account ID
Compliance family (including custom families)
Compliance control
Rule ID
Resources Report
The Resources Report for an organization or tenant allows you to view details in tabular format regarding resources, their compliance status, and the rule results that impact that status. (Does not support drills.)
Example Tenant View:

Resources Report Filters
Tenant (Organization View only)
Environment
Service provider (e.g., AWS, AWS_GOVCLOUD, AZURE, GOOGLE, or REPOSITORY)
Resource type
Provider account ID
Resource compliance
Compliance family (including custom families)
Whether the resource has rule results
Compliance Family Dashboards
Compliance Family Dashboards allow you to visualize information on resource compliance by resource type, severity, and environment over time for supported compliance families:
AWS Well-Architected Framework
CIS AWS Foundations Benchmark
CIS Azure Foundations Benchmark
CIS Controls
CIS Docker Benchmark
CIS Google Foundations Benchmark
CIS Kubernetes Foundations Benchmark
CSA Cloud Controls Matrix
GDPR
HIPAA
ISO 27001
NIST 800-53
PCI DSS
SOC 2
For example, the SOC 2 (2017) Dashboard for an organization or tenant allows you to visualize information on resource compliance by resource type, severity, and environment over time for SOC 2 (v2017).
Example Tenant View:
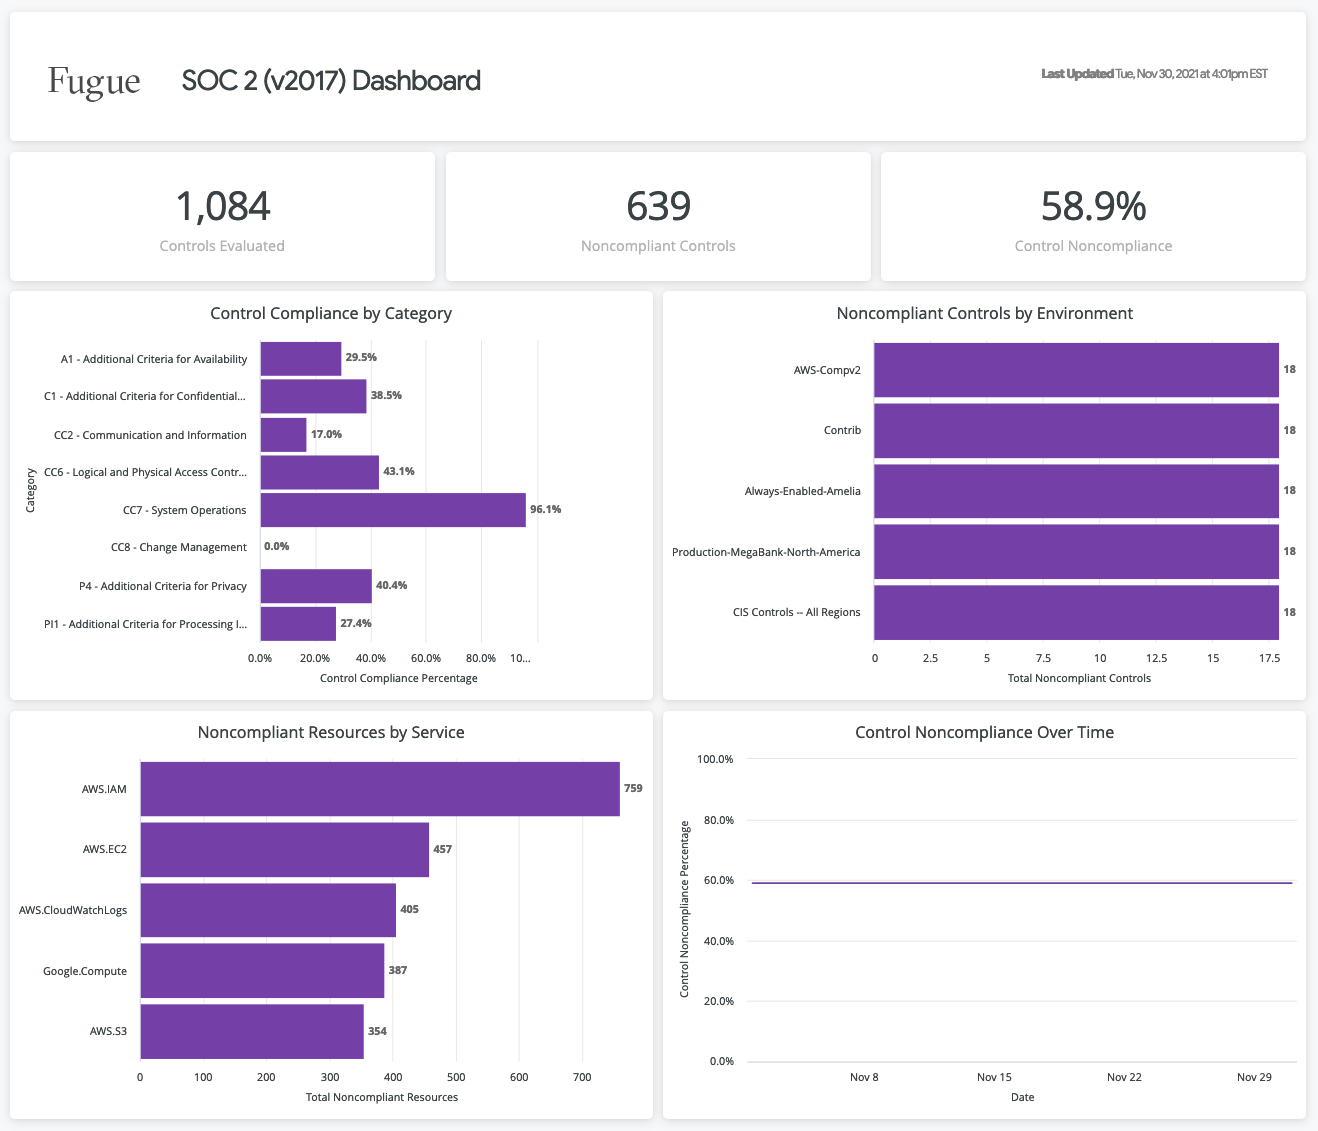
Each report includes the following information:
Controls Evaluated (Total)
Noncompliant Controls (Total)
Control Noncompliance (Percentage)
Control Compliance By Category (Percentage)
Noncompliant Controls by Tenant (Total) – Organization View only
Noncompliant Controls By Environment (Total) – Tenant View only
Noncompliant Resources By Service (Total)
Control Noncompliance Over Time (Percentage)
Compliance Family Dashboards Filters
Tenant (Organization View only)
Service provider (e.g., AWS, AWS_GOVCLOUD, AZURE, GOOGLE, or REPOSITORY)
Environment
Data from (time frame)
Compliance family
How to Filter a Report or Dashboard
To apply one or more filters to a report, follow the steps below:
1. Select the desired report or dashboard from the Reports page.
2. Next to the category you want to filter by, select a condition from the dropdown menu (“is,” “contains,” etc.).
3. Click inside the text box to the right of the condition. A dropdown menu of properties will appear. You can start typing, and the field will suggest autocompletions.
4. Repeat as needed to apply additional filters.
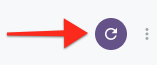
5. Select the Reload/Update button:
How to Create an Alert
To set up an email alert when a metric breaches a specified threshold, follow the steps below:
1. Select the desired report or dashboard from the Reports page.
2. Optionally apply filters to the report. The filters will also be applied to the alert.
3. Hover over the specific report you’d like to be alerted about and select the Alerts (bell) icon that appears:
4. The metric is pre-selected for you (e.g., “Total Rule Results”). Select a condition (“is greater than,” “is less than,” etc.) and enter a threshold. When the threshold is breached, the alert will trigger.
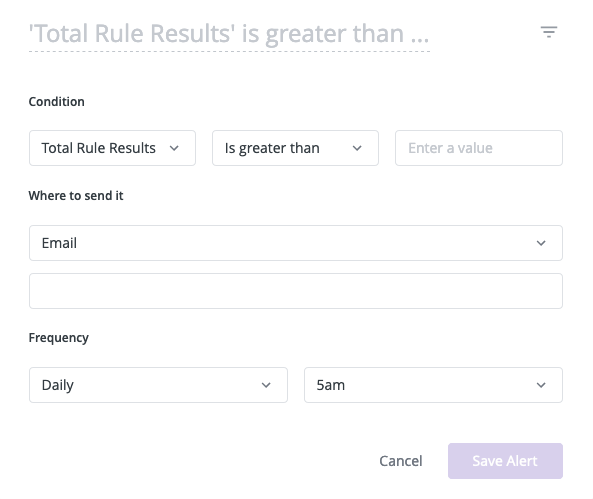
5. The email delivery method is preselected for you. Enter one or more email addresses in the field below it.
6. Select the desired frequency of the alert.
7. Select Save Alert.
How to Edit or Duplicate an Alert
To edit or duplicate an existing alert, follow the steps below:
1. Select the desired report or dashboard from the Reports page.
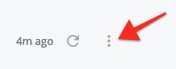
2. Hover over a specific report. If alerts exist for the report, the Alert (bell) icon shows the number:

3. Select the Alert (bell) icon to see a list of alerts:
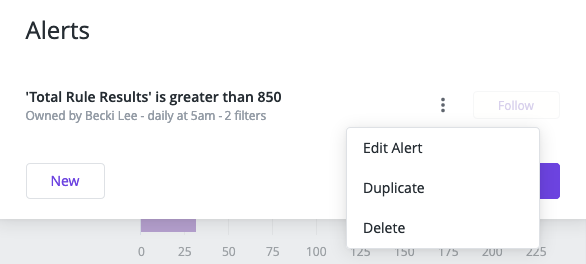
4. Select the three dots (Alert Options) icon and select Edit Alert or Duplicate Alert:
5. Make your changes and select Save Alert.
How to Delete an Alert
To delete an existing alert, follow the steps below:
1. Select the desired report or dashboard from the Reports page.
2. Hover over a specific report. If alerts exist for the report, the Alert (bell) icon shows the number:
3. Select the Alert (bell) icon to see a list of alerts:
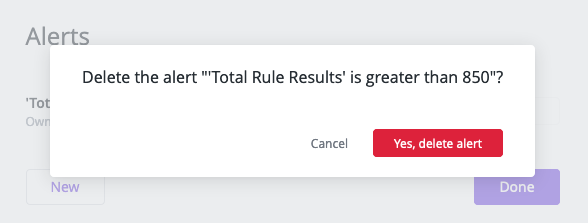
4. Select the three dots (Alert Options) icon and select Delete Alert:
5. Select Yes, delete alert:
How to Download a Report
You can download a report by PDF or CSV. You can also drill down into most reports and download the results.
PDF
To download a report by PDF, follow the steps below:
1. Select the ellipsis next to the Reload/Update button in the upper right:
2. Select Download.
3. Select PDF from the Format drop-down.
4. Optionally set the paper size, expand tables to show all rows, or arrange dashboard tiles in a single column.
5. Select Open in Browser to generate and load the PDF in your browser window, or Download to download the PDF.
CSV
To download a report by CSV, follow the steps below:
1. Select the ellipsis next to the Reload/Update button in the upper right:
2. Select Download.
3. Select CSV from the Format drop-down.
4. Click Download to download a ZIP containing a CSV file for each report in the dashboard.
How to Send a Report by Email Immediately
To send a report by email immediately, follow the steps below:
1. Select the ellipsis next to the Reload/Update button in the upper right:
2. Select Schedule delivery.
3. If a previously scheduled report is listed, you can select Send now to send it immediately, or select New to create a new one.
4. If sending a new email, in the Settings tab, under Recurrence, select Send now.
5. Under Email addresses, specify the recipient(s).
6. Under Format, select PDF, CSV zip file, or PNG visualization.
7. Optionally, in the Filters tab, specify any desired filters.
8. Optionally, configure additional settings in Advanced options. Available options vary based on data format.
9. Select Send now.
How to Schedule a Report by Email
To schedule a report by email, follow the steps below:
1. Select the ellipsis next to the Reload/Update button in the upper right:
2. Select Schedule delivery.
3. If a previously scheduled report is listed, select New to create a new one.
4. In the Settings tab, set the recurrence (e.g., daily) and time (e.g., 06:00).
5. Under Email addresses, specify the recipient(s).
6. Under Format, select PDF, CSV zip file, or PNG visualization.
7. Optionally, in the Filters tab, specify any desired filters.
8. Optionally, configure additional settings in Advanced options. Available options vary based on data format.
9. Optionally, select Test now. This sends a test email to all of the specified addresses.
10. Select Save.
How to Edit, Duplicate, or Delete a Scheduled Email
1. Select the ellipsis next to the Reload/Update button in the upper right:
2. Select Schedule delivery.
3. Select the ellipsis next to the scheduled report you want to edit, duplicate, or delete.
4. Select Edit, Duplicate, or Delete.
5. If editing or duplicating, make your changes and select Save.
6. If deleting, select Delete.
How to Unsubscribe from a Scheduled Email
Users can unsubscribe to scheduled emails by selecting the “unsubscribe” link in the email body.
Sending the Report to an Amazon S3 Bucket Using an IAM Role
Fugue provides the ability to send and schedule report data to Amazon S3 using a trusted IAM role. This prevents the need to generate long-standing AWS Access Keys, instead relying on a trusted IAM policy to delegate access to your S3 bucket to Fugue, a general best practice when dealing with credentials.
Note
Fugue recommends that you create a separate S3 bucket for receiving data deliveries, if possible. See Creating a Bucket.
You can schedule reports to be delivered to an Amazon S3 bucket of your choice using an IAM Role. This is a two step process.
Create a Sufficently Permissioned IAM role
To provide the required parameters, you will need to create an S3 Bucket and associated IAM role in the same AWS Account to grant permissions to Fugue to upload data when your data send or schedule is executed.
This IAM role should specify the following IAM Policy and Trust Relationship, replacing the following placeholders:
bucket-name: Name of the S3 Bucket where files should be uploaded. See Creating a Bucket.
optional-s3-path: Optional path where files should be placed. Leave this empty to have them placed in the root of the bucket.
aws-kms-key-arn: The ARN of the AWS Key Management Service used to encrypt data within your S3 bucket. Fugue strongly recommends you utilize an SSE-KMS encryption when creating S3 Buckets, with a specific key being created and only used for this bucket. This will ensure your S3 Buckets will be compliant with various Fugue Rules and general S3 best practices. If your target S3 Bucket utilizes Amazon S3 key (SSE-S3) or no encryption, you may omit the entire “KMS” section of this policy when creating your IAM role.
external-id-value: When assuming your Role, Fugue will utilize this External ID value in the same way it does for AWS Environment Role Assumption. You can learn more about External IDs here, but in general, they prevent others from assuming this role and using it for other purposes. Instructions for retrieving your External ID value in Fugue can be found here.
To create a sufficiently permissioned IAM role:
1. Navigate to IAM.
2. In the left navigation, select Roles.
3. Click Create role.
4. In select type of trusted entity, select AWS service > S3 > S3 (Allows S3 to call AWS services on your behalf). Click Next: Permissions.
5. Select Create policy. The Create policy workflow opens in a new tab.
6. In Create policy, select the JSON tab.
7. Enter the following information:
Replace
#<your-bucket-name>/<optional-s3-path>with your S3 bucket name and optionally, include the path (line 13).Replace
#<aws-kms-key-arn>with your KMS Key encrypted for objects stored in your S3 bucket. If you did not use SSE-KMS on your S3 bucket, delete this section of the policy (line 28).Replace
#<your-bucket-name>with your S3 bucket name (line 33).
{
    "Version": "2012-10-17",
    "Statement": [
        {
            "Sid": "S3Object",
            "Effect": "Allow",
            "Action": [
                "s3:PutObject",
                "s3:AbortMultipartUpload",
                "s3:ListMultipartUploadParts"
            ],
            "Resource": [
                "arn:aws:s3:::<your-bucket-name>/<optional-s3-path>/*"            ]
        },
        {
            "Sid": "KMS",
            "Effect": "Allow",
            "Action": [
                "kms:Decrypt",
                "kms:Encrypt",
                "kms:GenerateDataKey",
                "kms:GenerateDataKeyWithoutPlaintext",
                "kms:GenerateDataKeyPairWithoutPlaintext",
                "kms:GenerateDataKeyPair"
            ],
            "Resource": [
                "<aws-kms-key-arn>"            ]
        },
        {
            "Sid": "S3Bucket",
            "Effect": "Allow",
            "Action": "s3:ListBucketMultipartUploads",
            "Resource": "arn:aws:s3:::<your-bucket-name>"        }
    ]
}
8. Click Next: Tags. (Optionally) Add tags and click Next: Review.
9. Enter a Name for your policy. (Optionally) Enter a Description for your policy. Click Create policy.
10. Navigate back to the Roles tab and click the refresh icon.
11. In the search field, enter the name of the newly created policy and select it.
12. Click Next: Tags. (Optionally) Add tags and click Next: Review.
13. Enter a role name and click Create role.
14. On the Roles page, search and select your newly created role.
15. Select Trust relationships > Edit trust relationship.
16. In Edit Trust Relationship, enter the following information in the Policy Document section:
Replace
#<external-id-value>with your external ID. Instructions for retrieving your External ID value in Fugue can be found here (line 12).
{
  "Version": "2012-10-17",
  "Statement": [
    {
      "Effect": "Allow",
      "Principal": {
        "AWS": "arn:aws:iam::370134896156:role/ReportIntegrationRole"
      },
      "Action": "sts:AssumeRole",
      "Condition": {
        "StringEquals": {
          "sts:ExternalId": "<external-id-value>"        }
      }
    }
  ]
}
17. Click Update Trust Policy.
Schedule the Report to be Sent to an AWS S3 Bucket via IAM Role
To schedule the report to be sent to an Amazon S3 bucket via IAM role:
1. Select the ellipsis next to the Reload/Update button in the upper right:
2. Select Schedule delivery.
3. If a previously scheduled report is listed, select New to create a new one.
4. In the Settings tab, set the recurrence (e.g., daily) and time (e.g., 06:00).
5. Under Destination, select Amazon S3 (IAM Role).
6. Specify the following information:
In Bucket, enter the bucket name. See Creating a Bucket.
(Optionally) Enter the path where files should be placed (e.g.,
folder/sub1/sub2). Leave this empty to have them placed in the root of the bucket.Enter your IAM Role.
Select the Region in which your S3 bucket lives.
In Send All Results?, select Yes or No. If you select No, only the first 5,000 rows are sent.
In Format, select PDF, CSV zip file, or PNG visualization.
7. Optionally, in the Filters tab, specify any desired filters.
8. Optionally, configure additional settings in Advanced options. Available options vary based on data format.
9. Optionally, select Test now. This uploads the report to the specified bucket.
10. Select Save.
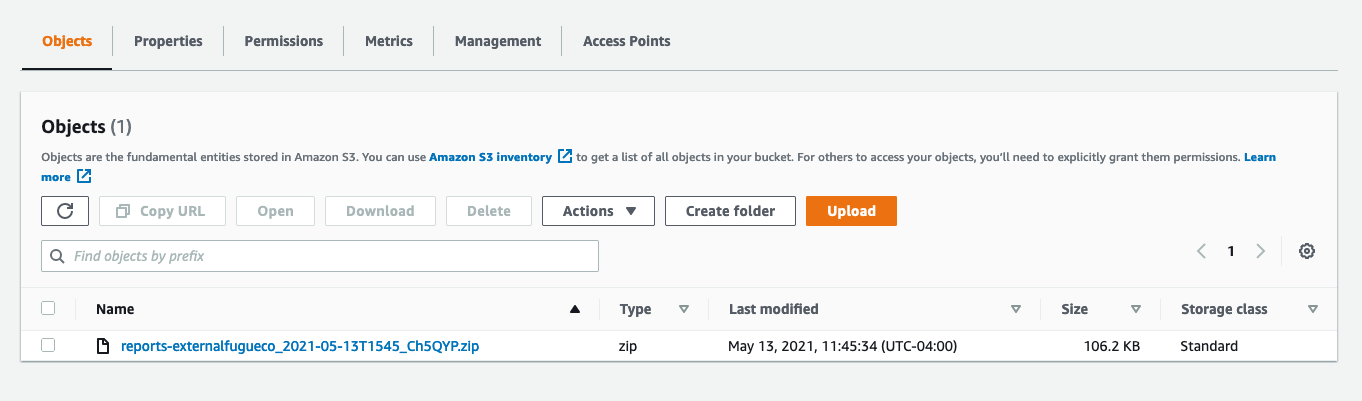
The report sent to your AWS S3 bucket includes the date/time.
Sending the Report to an Amazon S3 Bucket Using Access Key
You can schedule reports to be delivered to an Amazon S3 bucket of your choice using an Access Key.
Note
There is a limit of 5,000 rows of data being sent using the Access Key. As a best practice, Fugue recommends using an IAM Role to send/schedule the reports. Refer to Schedule a report to be sent to an AWS S3 bucket using IAM Role for more information.
To schedule the report to be sent to an Amazon S3 bucket:
1. Select the ellipsis next to the Reload/Update button in the upper right:
2. Select Schedule delivery.
3. If a previously scheduled report is listed, select New to create a new one.
4. In the Settings tab, set the recurrence (e.g., daily) and time (e.g., 06:00).
5. Under Destination, select Amazon S3.
6. Specify the following information:
In Bucket, enter the bucket name. See Creating a Bucket.
(Optionally) Enter the path where files should be placed (e.g.,
folder/sub1/sub2). Leave this empty to have them placed in the root of the bucket.Enter the AWS Access Key ID and Secret Access Key corresponding to an IAM user that has the appropriate permissions. If your AWS S3 Bucket is encrypted using SSE with a customer managed KMS Key,
kms:Encryptandkms:GenerateDataKeyis also required. Refer to Creating a Sufficiently Permissioned IAM User for more information.Enter the S3 bucket region.
In Format, select PDF, CSV zip file, or PNG visualization.
7. Optionally, in the Filters tab, specify any desired filters.
8. Optionally, configure additional settings in Advanced options. Available options vary based on data format.
9. Optionally, select Test now. This uploads the report to the specified bucket.
10. Select Save.
The report sent to your AWS S3 bucket includes the date/time, as shown below.
Creating a Sufficiently Permissioned IAM User
The IAM user will need access to a policy with the following permissions:
For AWS S3:
s3:PutObject(required for all)If the AWS S3 bucket is using SSE with a customer managed KMS key, then
kms:Encryptandkms:GenerateDataKeyare also required
Below is an example IAM policy to provide s3:PutObject permissions:
{
   "Version": "2012-10-17",
   "Statement": [
       {
           "Action": [
               "s3:PutObject"
           ],
           "Resource": [
               "arn:aws:s3:::YOUR_BUCKET_NAME/OPTIONAL_SUBDIRECTORY/*"
           ],
           "Effect": "Allow",
           "Sid": "S3PutObject"
       }
   ]
}
Below is an example IAM policy to provide KMS permissions:
{
   "Version": "2012-10-17",
   "Statement": {
       "Action": [
           "kms:Encrypt",
           "kms:GenerateDataKey"
       ],
       "Resource": "YOUR_KMS_KEY_ARN",
       "Effect": "Allow"
   }
}
For more information refer to:
How to Drill Down Into a Report
To drill down into a report, select the report/dashboard on the Reports page, then select a chart. Not all charts/reports/dashboards support drills.
Below, we’ve drilled down into the Rule Violations By Severity report in the Compliance Posture Dashboard, selecting only the violations of medium severity:
You can download the drill data:

Resource ID and Resource Native ID
The fields Resource ID and Resource Native ID are identical in Azure and Google environments.
In AWS environments:
Resource Native ID is the full ARN (e.g.,
arn:aws:s3:::my-rad-bucket).Resource ID is the short name for the resource (e.g.,
my-rad-bucket).
Not all resource types support a native ID. Resources without a native ID will display a blank field in the Resource Native ID column.
The Resource filter accepts both types of ID.