Example: Fugue CI/CD with Terraform, GitHub, CircleCI
Note
This is part 1 in a series. For part 2, see Example: Fugue CI/CD with Regula Pre-Deployment Checks.
Note
Fugue’s infrastructure as code (IaC) security features for repository environments are now available in closed beta. Fugue IaC security integrates with Regula to scan code files locally and in CI/CD pipelines. To request access, contact support@fugue.co.
Our example-tf-circleci GitHub repo shows you how to integrate Fugue into your CI/CD pipeline in order to detect resource misconfiguration and compliance violations as part of every deployment. The example will deploy infrastructure into your AWS account (see remotestate.tf, main.tf), and it incorporates the following components:
Amazon Web Services (AWS): Provide cloud infrastructure (a VPC and security group)
Terraform: Define infrastructure as code
GitHub: Store infrastructure as code in version control
CircleCI: Deploy infrastructure via Terraform and kick off Fugue scan
Fugue: Scan infrastructure for any noncompliant resources and set a new baseline
Get Started
You’ll find the full walkthrough in the README. All the code you need is in the repo.
This page includes supplemental information to the walkthrough:
Quick Start
Warning
This example will deploy infrastructure into your AWS account, so make sure you’re OK with the resources you’ll be creating in main.tf and remotestate.tf.
In a hurry? If you don’t need a detailed walkthrough, just follow the steps that require user action:
Create a Fugue environment with the following settings:
Region: us-west-1
Resource types:
AWS.EC2.SecurityGroup
AWS.EC2.Subnet
AWS.EC2.Vpc
Compliance family: CIS AWS Foundations Benchmark (CIS AWS)
-
Download ZIP of the example-tf-circleci repo and extract files into your own repo
Set up Terraform backend infrastructure in S3
In two places, change the
XXXXXXXXXXXXin the bucket name (line 3) to your 12-digit AWS account ID (see note):From the root directory of your GitHub repo:
cd remote_stateterraform initterraform planterraform apply– this will deploy infrastructure into your AWS account (see remotestate.tf)mv backend.tf.backup backend.tfterraform init
Move up to parent directory and commit/push changes:
cd .. && git add .circleci/ .gitignore .terraform-version Makefile backend.tf config.mk main.tf remote_state/ scan.shgit commit -m "Add CI CD example files" && git push
Configure CircleCI environment variables
AWS_ACCESS_KEY_ID(for CircleCI IAM user withAdministratorAccesspolicy)AWS_SECRET_ACCESS_KEY(for CircleCI IAM user withAdministratorAccesspolicy)FUGUE_API_ID(for Fugue CLI)FUGUE_API_SECRET(for Fugue CLI)FUGUE_ENV_ID(for Fugue environment ID)
-
Uncomment line 61 of .circleci/config.yml – this will deploy a VPC and security group into your AWS account
Commit and push changes:
git add .circleci/config.yml && git commit -m "Uncomment Terraform apply step" && git pushView results in CircleCI dashboard
Approve the
hold-for-approvalstep in the CircleCI workflow to apply the TerraformOptional: Comment out lines 16-21 of main.tf and commit/push again to fix the compliance violations
Optional: Fix any other compliance violations using the Rule Remediation Steps
List of files in the example
Let’s discuss what each file in the GitHub repo does:
.
├── .circleci
│   └── config.yml
├── .gitignore
├── .terraform-version
├── Makefile
├── README.md
├── backend.tf
├── config.mk
├── main.tf
├── remote_state
│   ├── Makefile
│   ├── README.md
│   ├── backend.tf.backup
│   ├── output.tf
│   ├── remotestate.tf
│   └── variables.tf
└── scan.sh
In the .circleci folder:
config.yml: CircleCI configuration file defining the build workflow
In the root folder:
.terraform-version: Terraform version manager tfenv file – if tfenv is installed, specifies the version of Terraform to use
Makefile: GNU Makefile to simplify Terraform commands
README.md: Instructions for use
config.mk: Configuration information for the Makefile
main.tf: Terraform infrastructure as code defining a single VPC and security group; this is what will be deployed in your AWS account via the CI/CD pipeline
backend.tf: Not to be confused with remote_state/backend.tf.backup, this backend configuration file specifies where state for
main.tfwill be stored in S3 (see Step 3: Set up Terraform backend for details)scan.sh: bash script that uses the Fugue CLI to scan your Fugue environment, report compliance state, and then pass/fail the build accordingly
In the remote_state folder:
Makefile: GNU Makefile to simplify Terraform commands
backend.tf.backup: The backend configuration file that specifies where state for
remotestate.tfwill be stored in S3 (similar but not identical tobackend.tfin the parent directory; we’ll explain the file extension in a little bit)output.tf: Values to be printed after
terraform applyremotestate.tf: Terraform infrastructure as code defining the resources that will make up the S3 backend
variables.tf: Variables to specify backend deployment details such as name prefixes
How to create a new CircleCI project
During the walkthrough, you’ll need to add a new CircleCI project. Here’s how to do it:
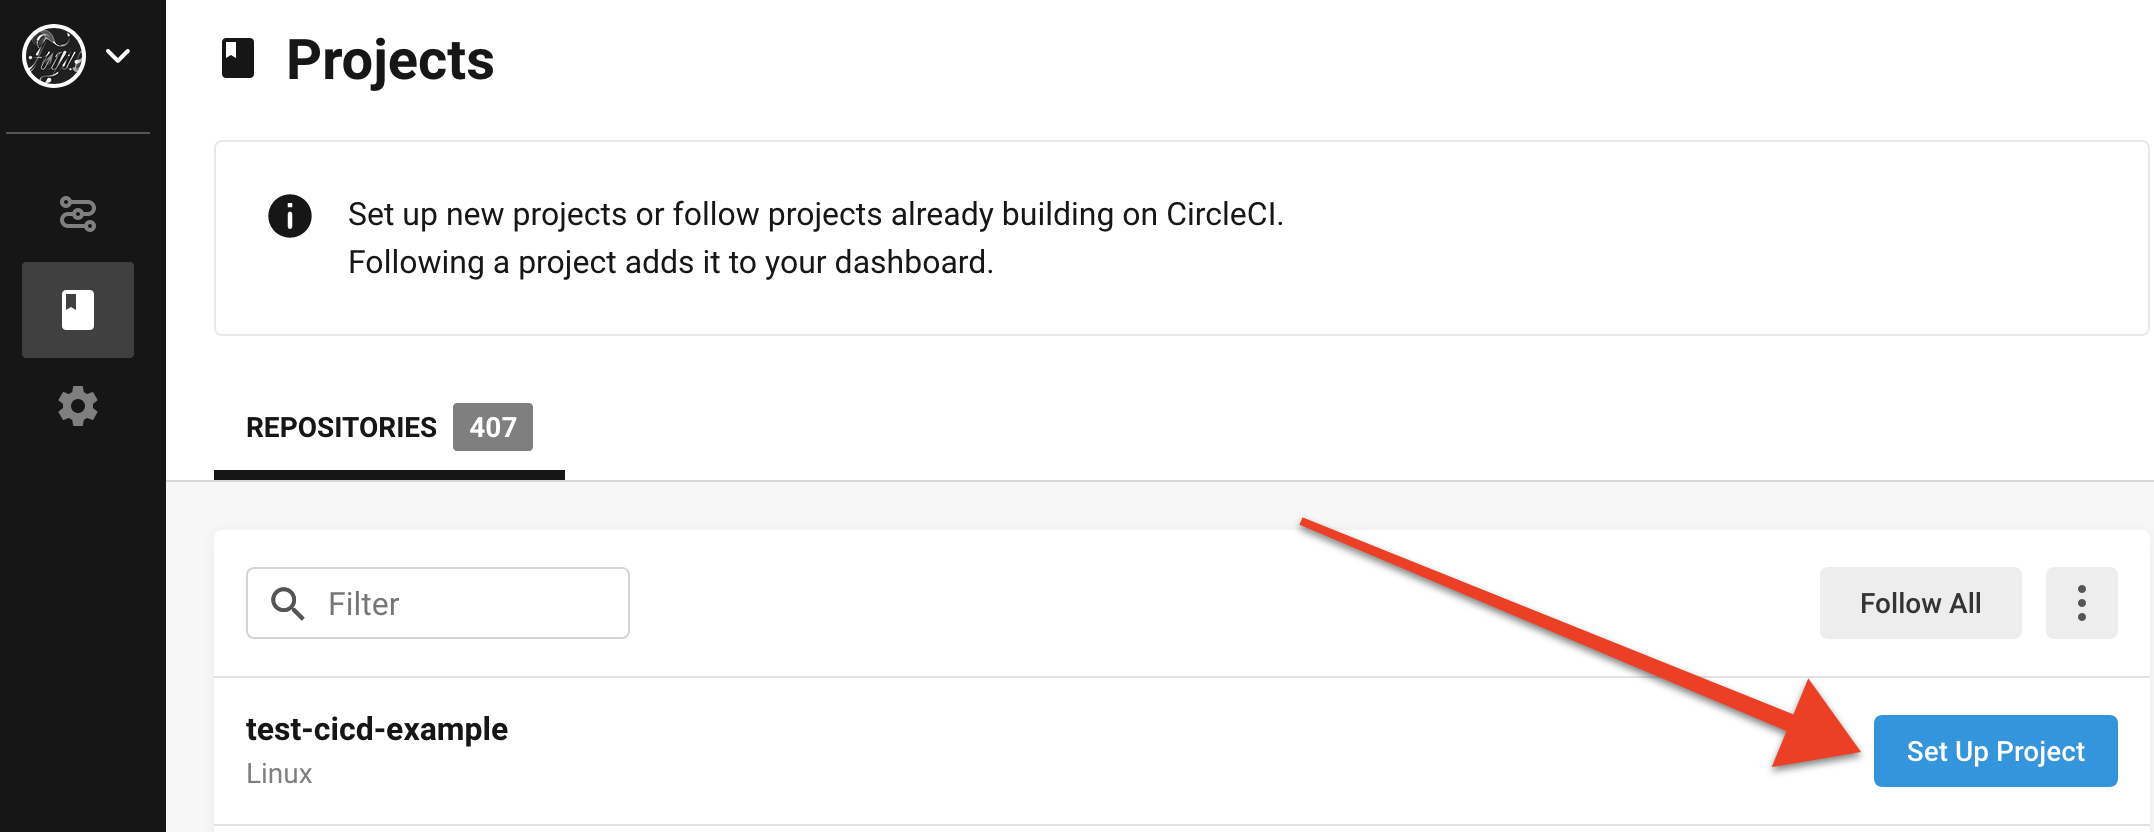
Log in to your CircleCI dashboard and select Add Projects from the left sidebar. You should see your repo in the list of repositories. Select the Set Up Project button:
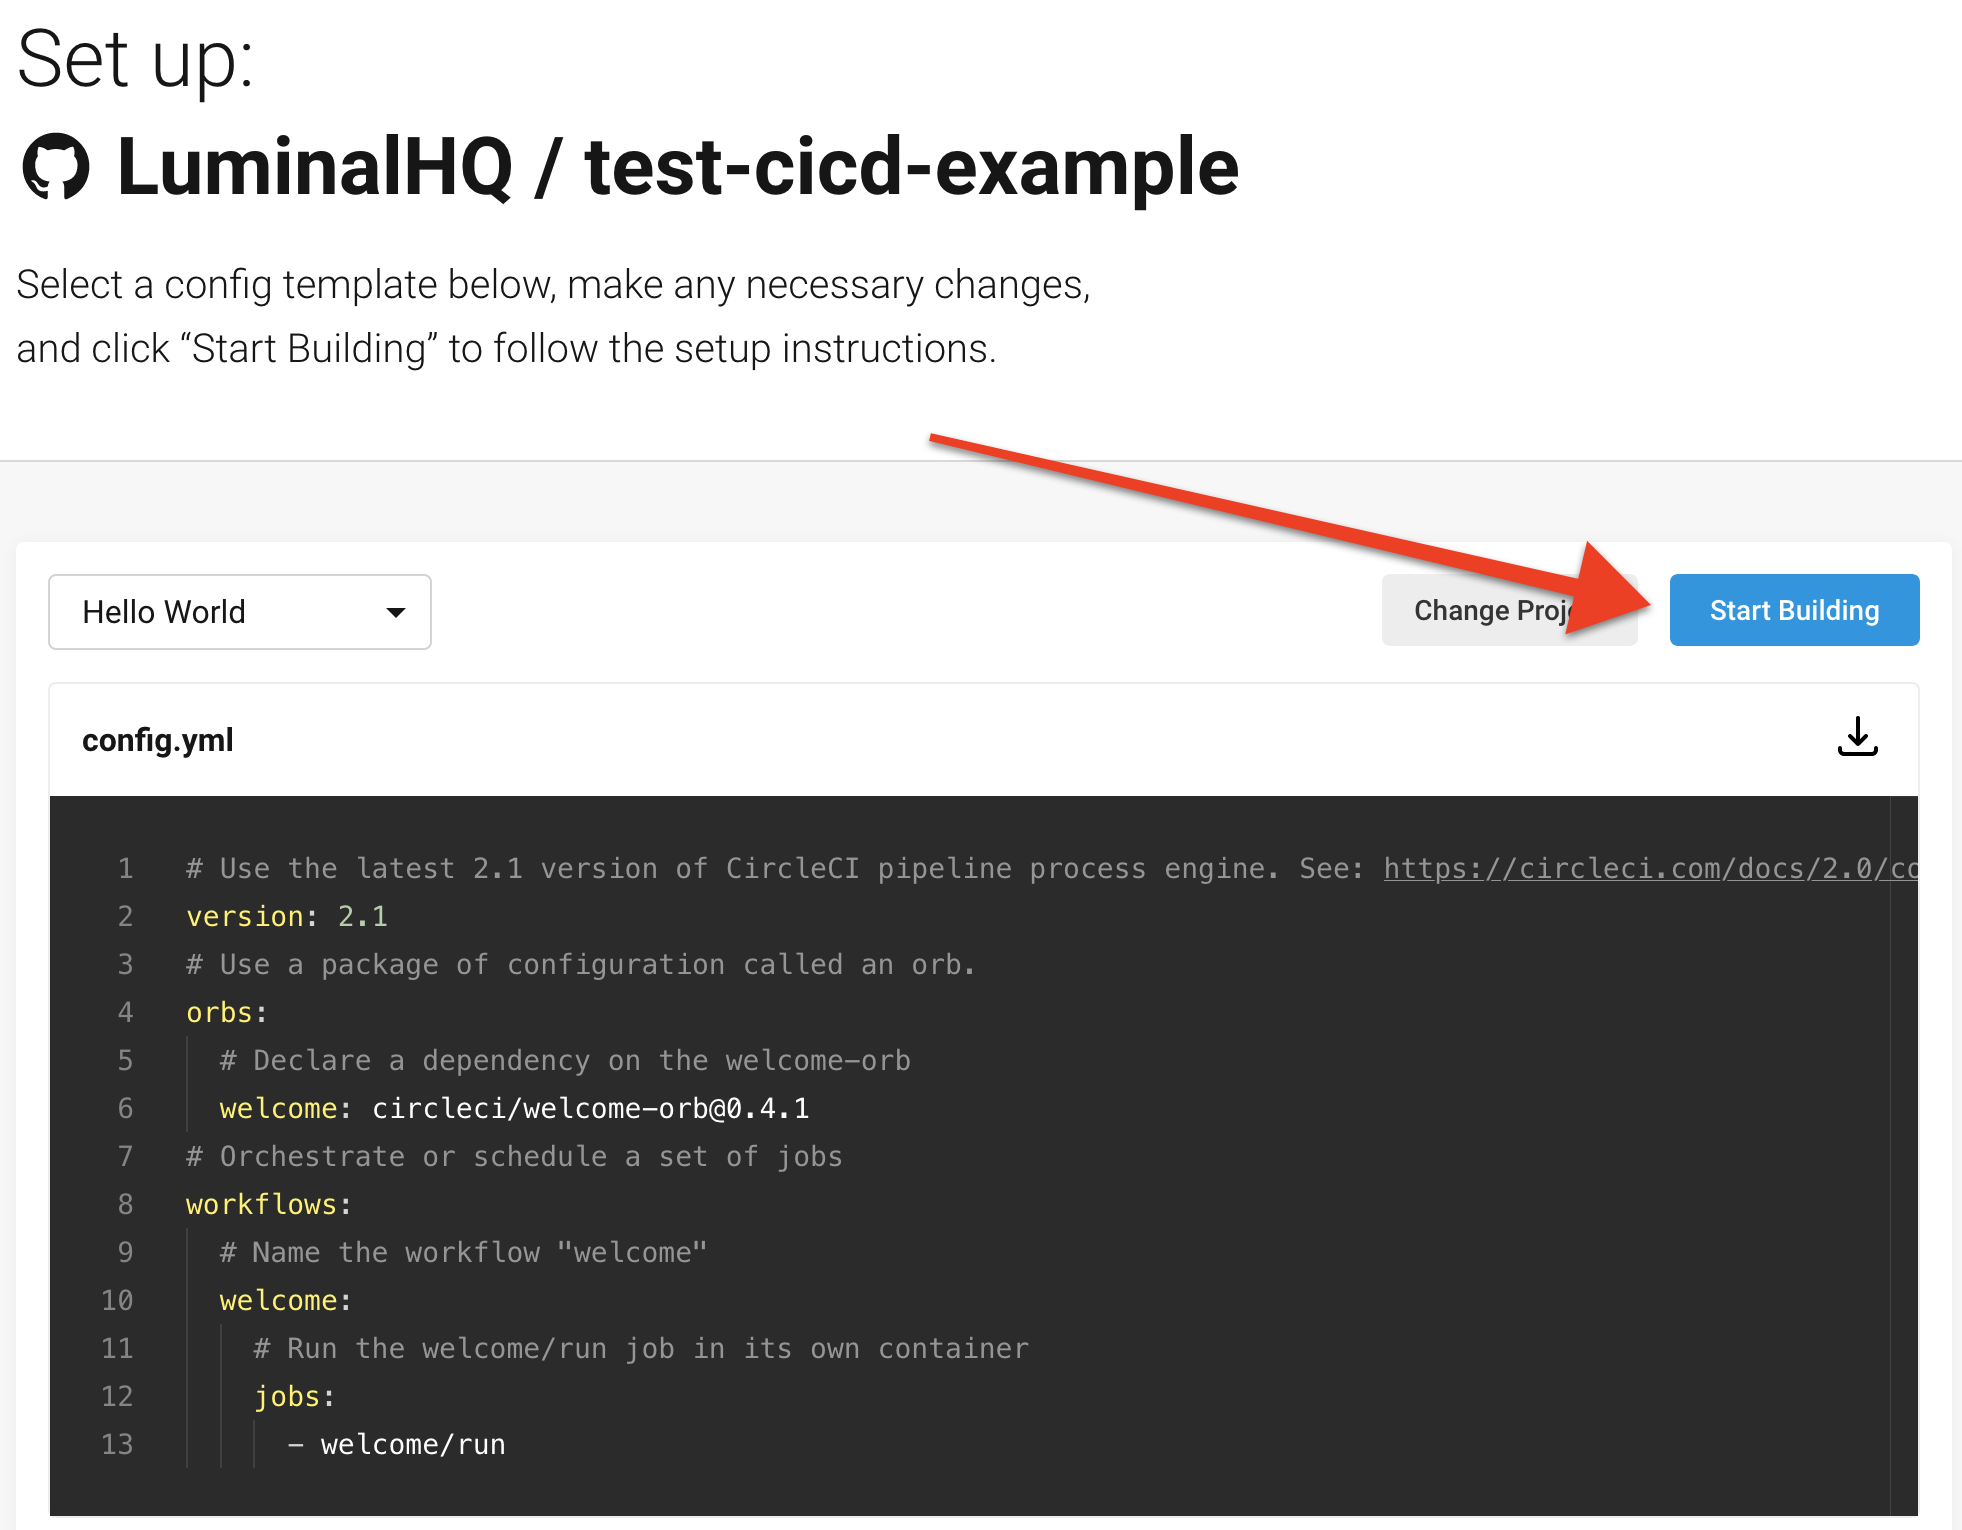
Next, select the Start Building button:
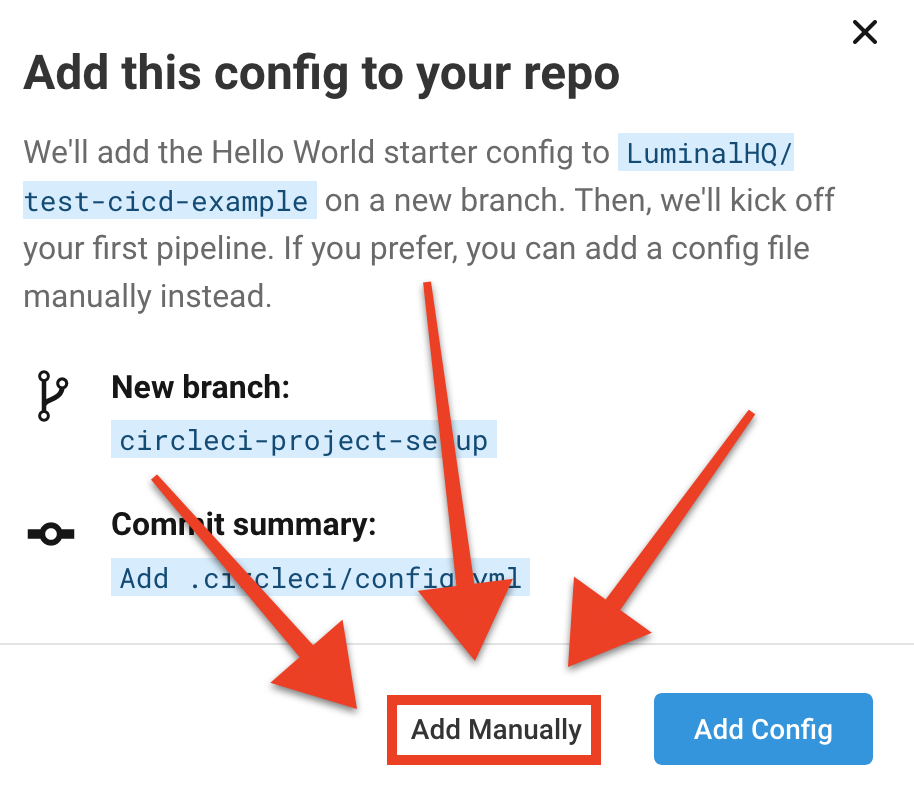
CircleCI asks whether you want it to add a config.yml file for you, which is unnecessary as our repo already has a configuration file. Be extra careful to select the Add Manually button:
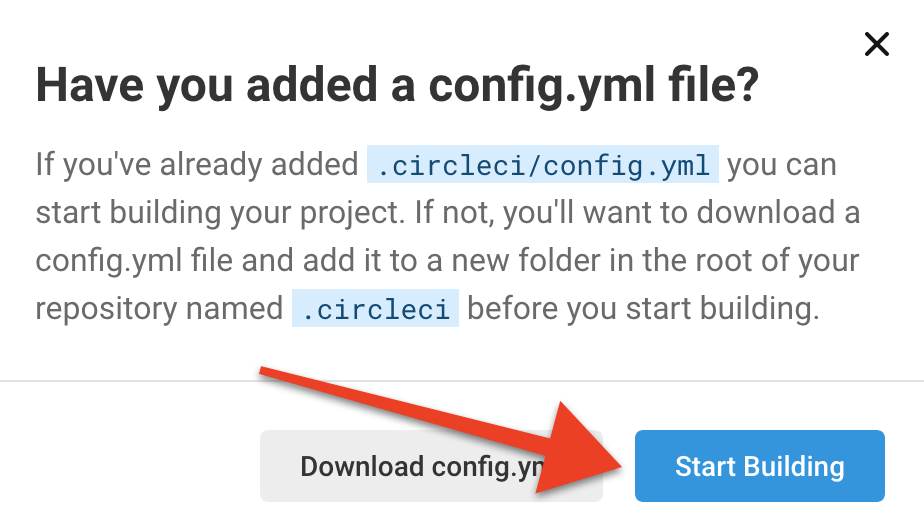
You’ll see another prompt double-checking that you already have a config.yml file in your repo. Go ahead and select Start Building:
You’ll be taken to the Pipelines page. Select the Project Settings button in the upper right corner.
How to create the CircleCI IAM user
In order to add the AWS access key ID and secret access key to your project settings, you’ll create a CircleCI IAM user in AWS.
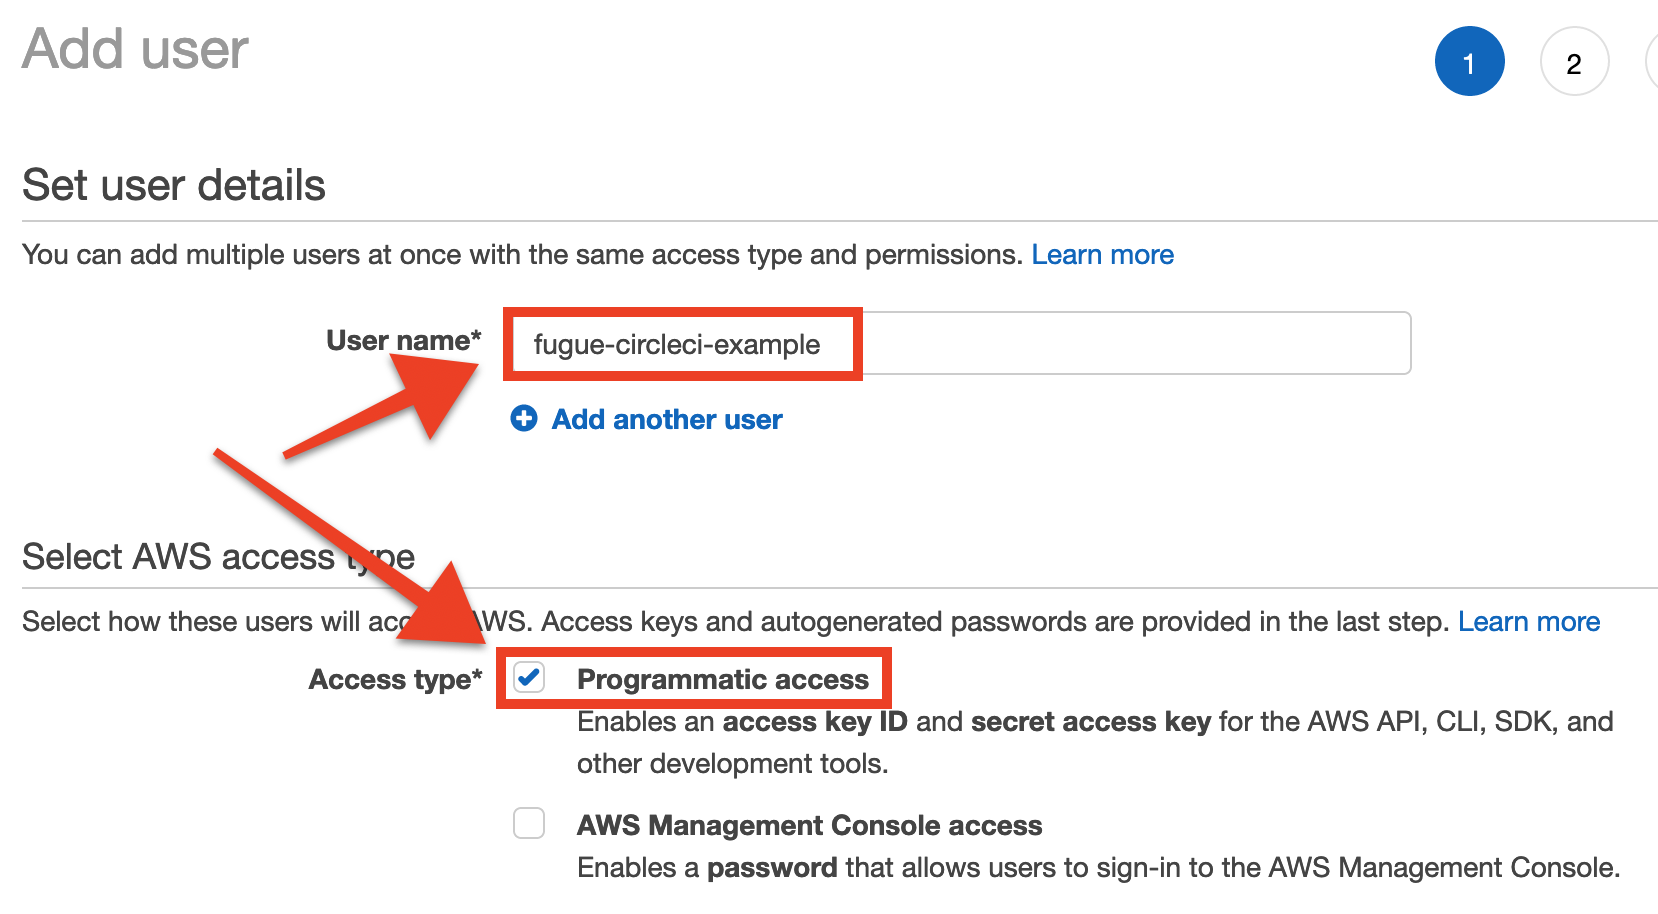
Navigate to the Users page of the IAM Management Console and click the Add User button.
Enter a user name – we named ours fugue-circleci-example – and check the box for programmatic access:
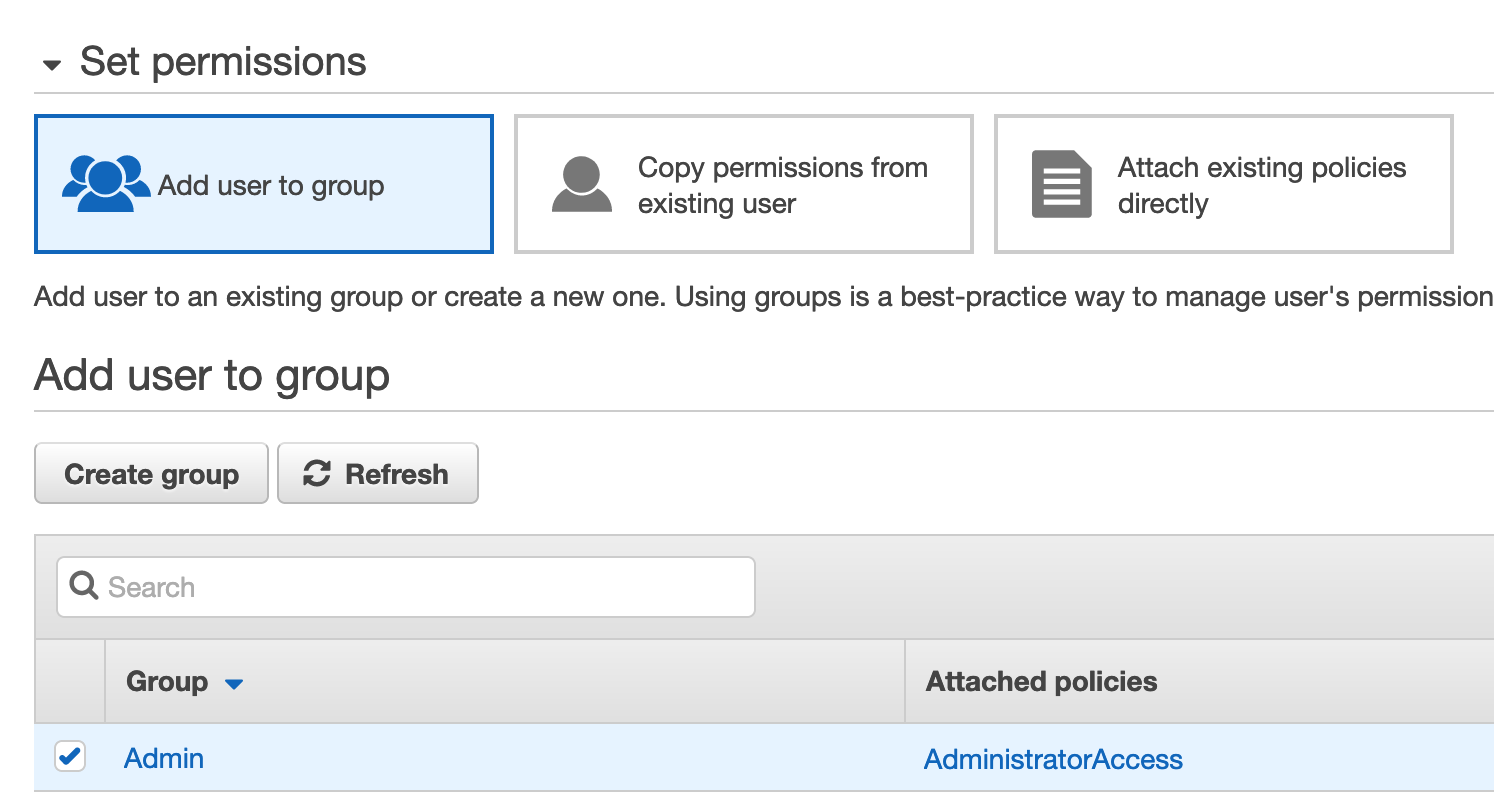
For the purposes of this example, we’ve given CircleCI administrative access so it can deploy infrastructure into our account. If you don’t already have an IAM group granting admin access, create a group and assign it the AWS-managed AdministratorAccess policy. (You can also attach the AdministratorAccess policy directly to the user through the Attach Existing Policies Directly button, although this violates CIS AWS 1-16.)
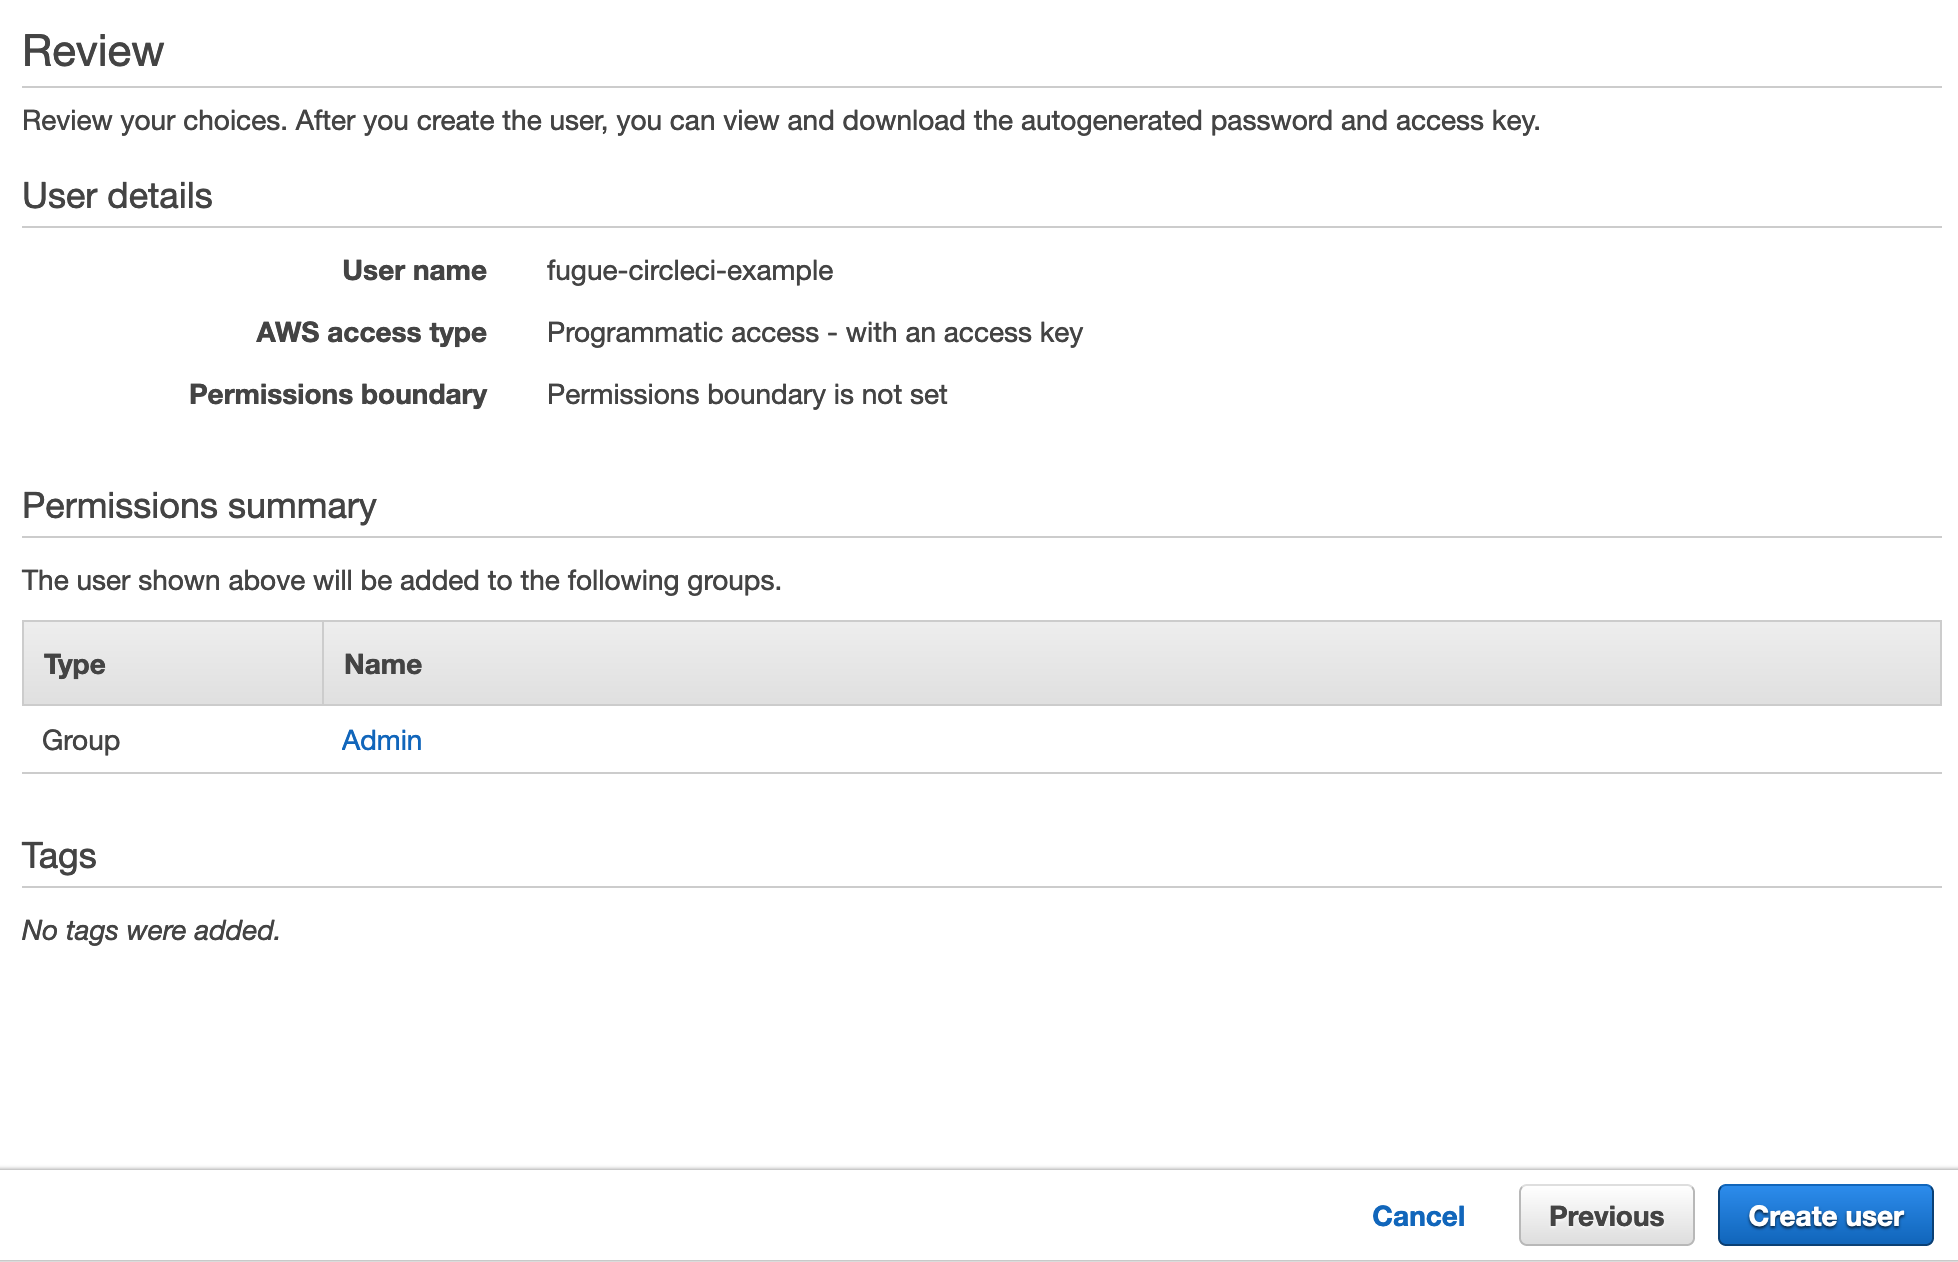
Give the user tags if you like, and then proceed to the review page. If all looks good, click the Create User button.
You should see a “Success” message, along with the new user’s access key ID and secret access key. Copy or download the credentials, then head back to the CircleCI project settings page and select Environment Variables from the left nav. Then select Add Environment Variable.

Follow the rest of the steps in the README.
Line-by-line explanation of configuration
See a line-by-line explanation for the following files:
.circleci/config.yml
We’ll take the CircleCI configuration line by line, but we’ll start at the end, where we define the workflows:
workflows:
   version: 2
   install-and-check-env:
     jobs:
        - terraform-init:
           filters:
             branches:
               only: master
        - terraform-plan:
           requires:
             - terraform-init
        - hold-for-approval:
           type: approval
           requires:
             - terraform-plan
        - terraform-apply-approval:
           requires:
             - hold-for-approval
        - scan:
           requires:
             - terraform-apply-approval
The workflow install-and-check-env described here can be summed up in English like so:
Run
terraform initonly on commits to themasterbranchIf the previous job succeeds, run
terraform planIf the previous job succeeds, require manual approval of the Terraform plan before proceeding with the rest of the build
If the plan is approved, run
terraform applywithout requiring additional human input; this deploys themain.tfinfrastructure in your accountIf the previous job succeeds, scan the Fugue environment assigned to the environment variable
FUGUE_ENV_IDand pass/fail the whole build according to the scan results
That’s the bird’s-eye view of what happens in our CircleCI workflow. Now we’ll take a lower-level look at the individual jobs, starting with the settings at the top of the config file.
# Python CircleCI 2.0 configuration file
#
# Check https://circleci.com/docs/2.0/language-python/ for more details
#
version: 2

defaults: &defaults
    docker:
      - image: circleci/python:3.6.1
    working_directory: ~/project
    environment:
      TF_IN_AUTOMATION: true
Above, this sets some basic defaults to be used from job to job. Each job uses a Python 3.6.1 Docker image. The TF_IN_AUTOMATION flag changes the human-readable output to reflect the fact that users don’t directly issue Terraform commands, which is a cosmetic change but nice for logs.
tf-install: &tf-install
  run:
    name: tf-install
    command: |
      wget https://releases.hashicorp.com/terraform/0.12.20/terraform_0.12.20_linux_amd64.zip
      sudo unzip terraform_0.12.20_linux_amd64.zip -d /usr/bin
      rm terraform_0.12.20_linux_amd64.zip
      terraform --version
This command downloads Terraform 0.12.20, unzips it, and moves it to a location within the $PATH, /usr/bin.
For the purposes of this example, we’ve used a stock Docker image that does not have the Terraform binary installed. This means we need to install it during every job in order to use it. To keep the config concise, we’ve defined a YAML anchor &tf-install so we can reuse the tf-install step wherever needed. We do this by referring to its alias *tf-install, which you’ll see further down.
In a real-life scenario, you’d likely want to create your own Docker image with Terraform preinstalled.
jobs:
  terraform-init:
    <<: *defaults
    steps:
      - checkout
      - *tf-install
      - run:
          name: init
          command: terraform init -input=false
      - persist_to_workspace:
          root: ~/project
          paths:
            - .
The first job, terraform-init, installs the Terraform binary (referring to the commands by the alias *tf-install), then initializes the project directory. The files are persisted to the workspace so subsequent jobs can access them.
terraform-plan:
  <<: *defaults
  steps:
    - attach_workspace:
        at: ~/project
    - *tf-install
    - run:
       name: plan
       command: terraform plan -out=plan.tfplan -input=false
    - persist_to_workspace:
        root: ~/project
        paths:
          - .
This command grabs the files persisted from the last job and generates a Terraform plan.
The -out=plan.tfplan flag saves the plan to disk so it can be persisted to the next job.
-input=false means that Terraform won’t request user input for variables if they aren’t already set, since this command is executed in CI/CD.
terraform-apply-approval:
  <<: *defaults
  steps:
    - attach_workspace:
        at: ~/project
    - *tf-install
    - run:
       name: apply
       command: |
         # Uncomment the line below to allow CircleCI to apply the Terraform
         terraform apply -input=false -auto-approve plan.tfplan
         echo Uncomment line 61 of config.yml to let CircleCI apply the Terraform
    - persist_to_workspace:
        root: ~/project
        paths:
          - .
This job is where the Terraform infrastructure as code becomes real infrastructure – with terraform apply.
You can see we’ve commented out the actual command that applies the Terraform using the plan.tfplan file generated in the previous job. This is because you’ll likely want to test out the pipeline before actually creating infrastructure in your AWS account. When you’re comfortable with the setup, you can uncomment the terraform apply line.
-auto-approve skips the usual request for interactive approval, applying the infrastructure without asking for confirmation. The flag is useful for CI/CD scenarios such as this; however, in general it’s important to be very careful when using it, especially in production environments. See Terraform’s recommendations about using it in automation.
scan:
  <<: *defaults
  steps:
    - attach_workspace:
        at: ~/project
    - run:
       name: scan-env
       command: |
         wget -O fugue https://github.com/fugue/fugue-client/releases/download/v0.13.1/fugue-linux-amd64
         chmod +x fugue
         sudo mv fugue /usr/local/bin
         set -e
         bash ./scan.sh
After the Terraform has been successfully applied, this job installs the Fugue CLI and runs the scan.sh bash script (see details).
scan.sh
We’ll start at the top of scan.sh:
#!/bin/sh

# Check for deprecated env vars and use them if present, but print note
if [ ! -z "$FUGUE_CLIENT_ID" ] || [ ! -z "$FUGUE_CLIENT_SECRET" ]; then
   printf "\nFUGUE_CLIENT_ID and FUGUE_CLIENT_SECRET are deprecated and will be removed in a future release. Please use FUGUE_API_ID and FUGUE_API_SECRET instead.\n"
   export FUGUE_API_ID=$FUGUE_CLIENT_ID
   export FUGUE_API_SECRET=$FUGUE_CLIENT_SECRET
fi

# If required credentials are not detected, print error and exit
if [ -z "$FUGUE_API_ID" ] || [ -z "$FUGUE_API_SECRET" ]; then
   printf "\nError: No credentials detected. Please set the FUGUE_API_ID and FUGUE_API_SECRET credentials.\n"
   exit 1
fi
This script uses the Fugue CLI, which requires the FUGUE_API_ID and FUGUE_API_SECRET environment variables. FUGUE_CLIENT_ID and FUGUE_CLIENT_SECRET are deprecated.
To preserve backwards compatibility, FUGUE_API_ID and FUGUE_API_SECRET will be set to the values of FUGUE_CLIENT_ID and FUGUE_CLIENT_SECRET, if the deprecated variables are detected.
If no variables are detected, the script prints an error and exits.
echo "Initiating Fugue scan..."

# Scan environment and redirect output
fugue scan $FUGUE_ENV_ID --wait --output json | jq '.' > scan_results.json
The Fugue CLI kicks off a scan of the Fugue environment specified in the FUGUE_ENV_ID environment variable. The output of the scan is saved to scan_results.json.
# Set scan ID env var
SCAN_ID=$(jq -r '.id' scan_results.json)

# Set noncompliant resources env var
NONCOMPLIANT=$(jq -r '.resource_summary.noncompliant' scan_results.json)

# Set scan status env var
SCAN_STATUS=$(jq -r '.status' scan_results.json)
When the scan is complete, assign the scan ID to the environment variable SCAN_ID, the number of noncompliant resources to NONCOMPLIANT, and the final status of the scan to SCAN_STATUS.
# Print results
cat scan_results.json | jq '.'
# If scan succeeds and any resources are noncompliant, get compliance by resource type, redirect output, and print noncompliant resources
if [ "$SCAN_STATUS" == "SUCCESS" ] && [ "$NONCOMPLIANT" != "0" ]; then
fugue get compliance-by-resource-types $SCAN_ID --output json > scan_results_noncompliant.json
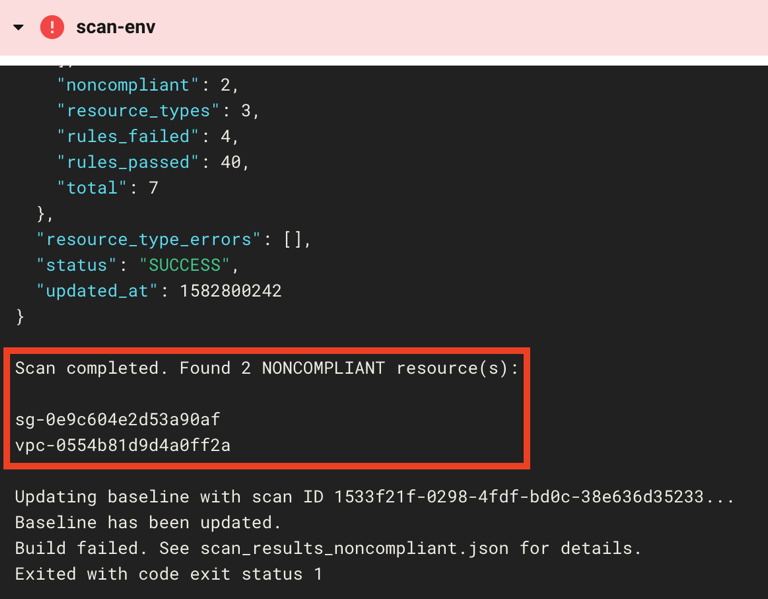
printf "\nScan completed. Found $NONCOMPLIANT NONCOMPLIANT resource(s):\n\n"
cat scan_results_noncompliant.json | jq -r '.items[].noncompliant[].resource_id'
# Update baseline with scan ID
printf "\nUpdating baseline with scan ID $SCAN_ID..."
fugue update env $FUGUE_ENV_ID --baseline-id $SCAN_ID --output json > update_baseline.json
BASELINE_ID=$(jq -r '.baseline_id' update_baseline.json)
if [ "$BASELINE_ID" == "$SCAN_ID" ]; then
printf "\nBaseline has been updated."
else
printf "\nError updating baseline."
fi
printf "\nBuild failed. See scan_results_noncompliant.json for details."
exit 1
# If scan succeeds and all resources are compliant, print compliance message, update baseline with scan ID
elif [ "$SCAN_STATUS" == "SUCCESS" ] && [ "$NONCOMPLIANT" == "0" ]; then
printf "\nScan completed. All resources are compliant."
printf "\nUpdating baseline with scan ID $SCAN_ID..."
fugue update env $FUGUE_ENV_ID --baseline-id $SCAN_ID --output json > update_baseline.json
BASELINE_ID=$(jq -r '.baseline_id' update_baseline.json)
if [ "$BASELINE_ID" == "$SCAN_ID" ]; then
printf "\nBaseline has been updated."
else
printf "\nError updating baseline. Build failed."
exit 1
fi
else
printf "\nScan error. Build failed. Baseline has not been updated."
exit 1
fi
This is a long chunk of code, but it’s rather straightforward. We’ll describe it in plain English below.
If the scan succeeded and any noncompliant resources were detected:
Print the number of noncompliant resources along with their resource IDs.
Set the resource configuration recorded in the scan as the new baseline. This facilitates drift detection, should you have notifications enabled.
Fail the workflow so the user knows there were compliance violations in the deployment.
If the scan succeeded and zero noncompliant resources were detected:
Print a success message.
Set the resource configuration recorded in the scan as the new baseline.
Pass the workflow unless the baseline update failed, in which case the overall workflow fails.
If anything else happened:
Print an error message.
Do not update the baseline.
Fail the workflow.
To continue the walkthrough from here, proceed to step 5.
Further reading
Don’t forget to visit the example-tf-circleci repo, which contains the full walkthrough and all of the code in this example.
Next, check out Part 2 of this example, where we add Regula to the front of the pipeline for pre-deployment compliance checks.